ToneRig

ToneRig 1.3.7 · iPhone, iPad, and Mac

Manual

The complete operating guide for building rigs, managing presets, and controlling ToneRig hands-free.

INPUTCOMPNAMCAB IRDELAYOUTPUT
01

Start here

Connect the hardware, confirm the route, and get a sound before building a larger rig.

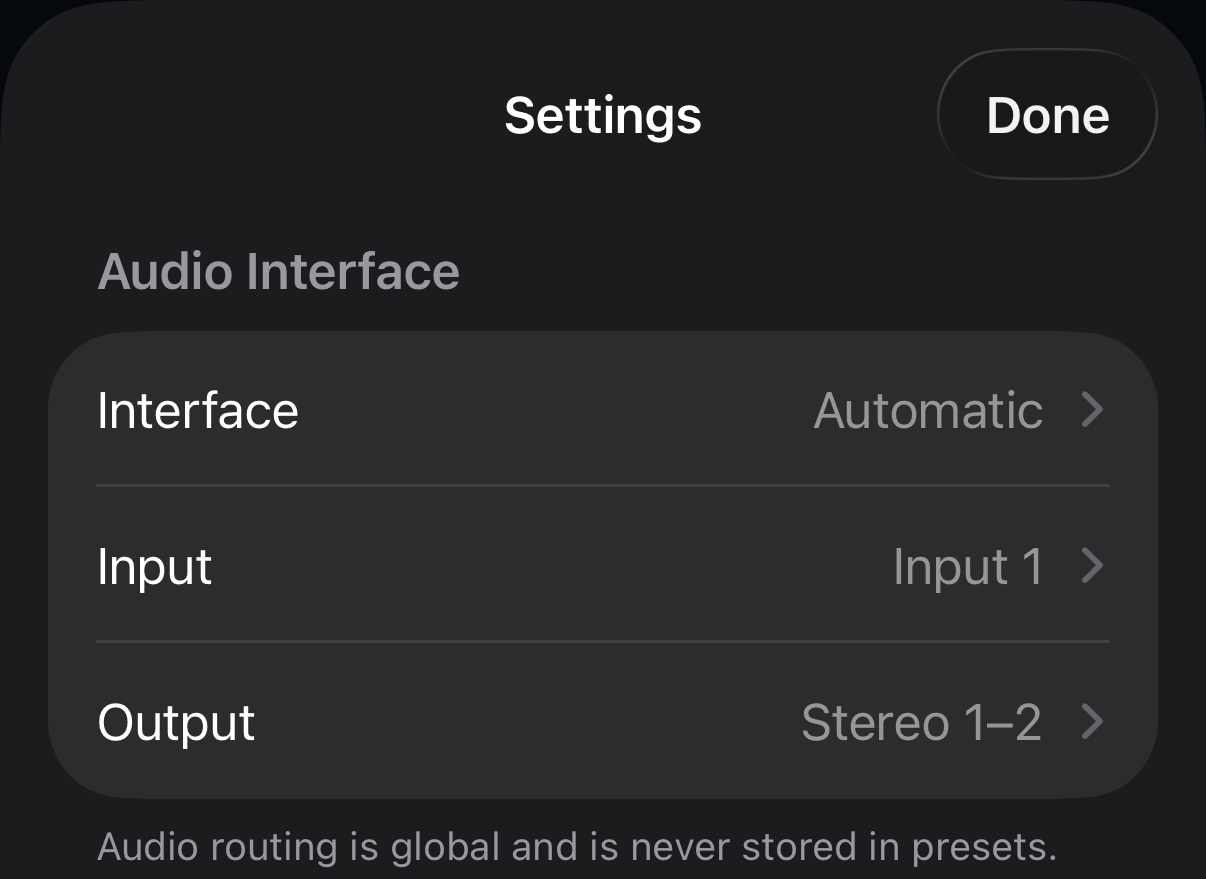
ToneRig Audio Interface settings showing interface, input, and output routing
Audio routing is global. Choose the interface and channels once, then presets stay portable.

What you need

An iPhone or iPad running iOS 17 or later, or a compatible Mac, plus an audio interface, your instrument, and headphones or monitors connected to the interface. On iPhone and iPad, use a class-compliant USB interface. Bluetooth audio is intentionally rejected because its latency is too high for live playthrough.

Connect in the right order

Connect the interface to the device, plug your instrument into the interface, then open ToneRig. Turn off direct or hardware monitoring on the interface or you may hear the dry input and processed rig at the same time.

Choose input and output

Open Settings, then Audio Interface. Choose Automatic or a specific interface, select the instrument input, and choose Stereo 1–2 or a mono output. Audio routing is global and is not stored inside presets.

Check the status

Settings shows the current device, sample rate, estimated latency, buffer size, and audio overload count. The workspace also shows input and output meters plus live CPU load. If the input meter does not move, check the selected channel and cabling first.

Balance latency and stability

A smaller buffer feels faster but leaves less processing time for NAM, effects, and interface animation. Raise the buffer if the overload counter climbs or the sound crackles. Changing it briefly restarts audio.

02

Workspace and signal chain

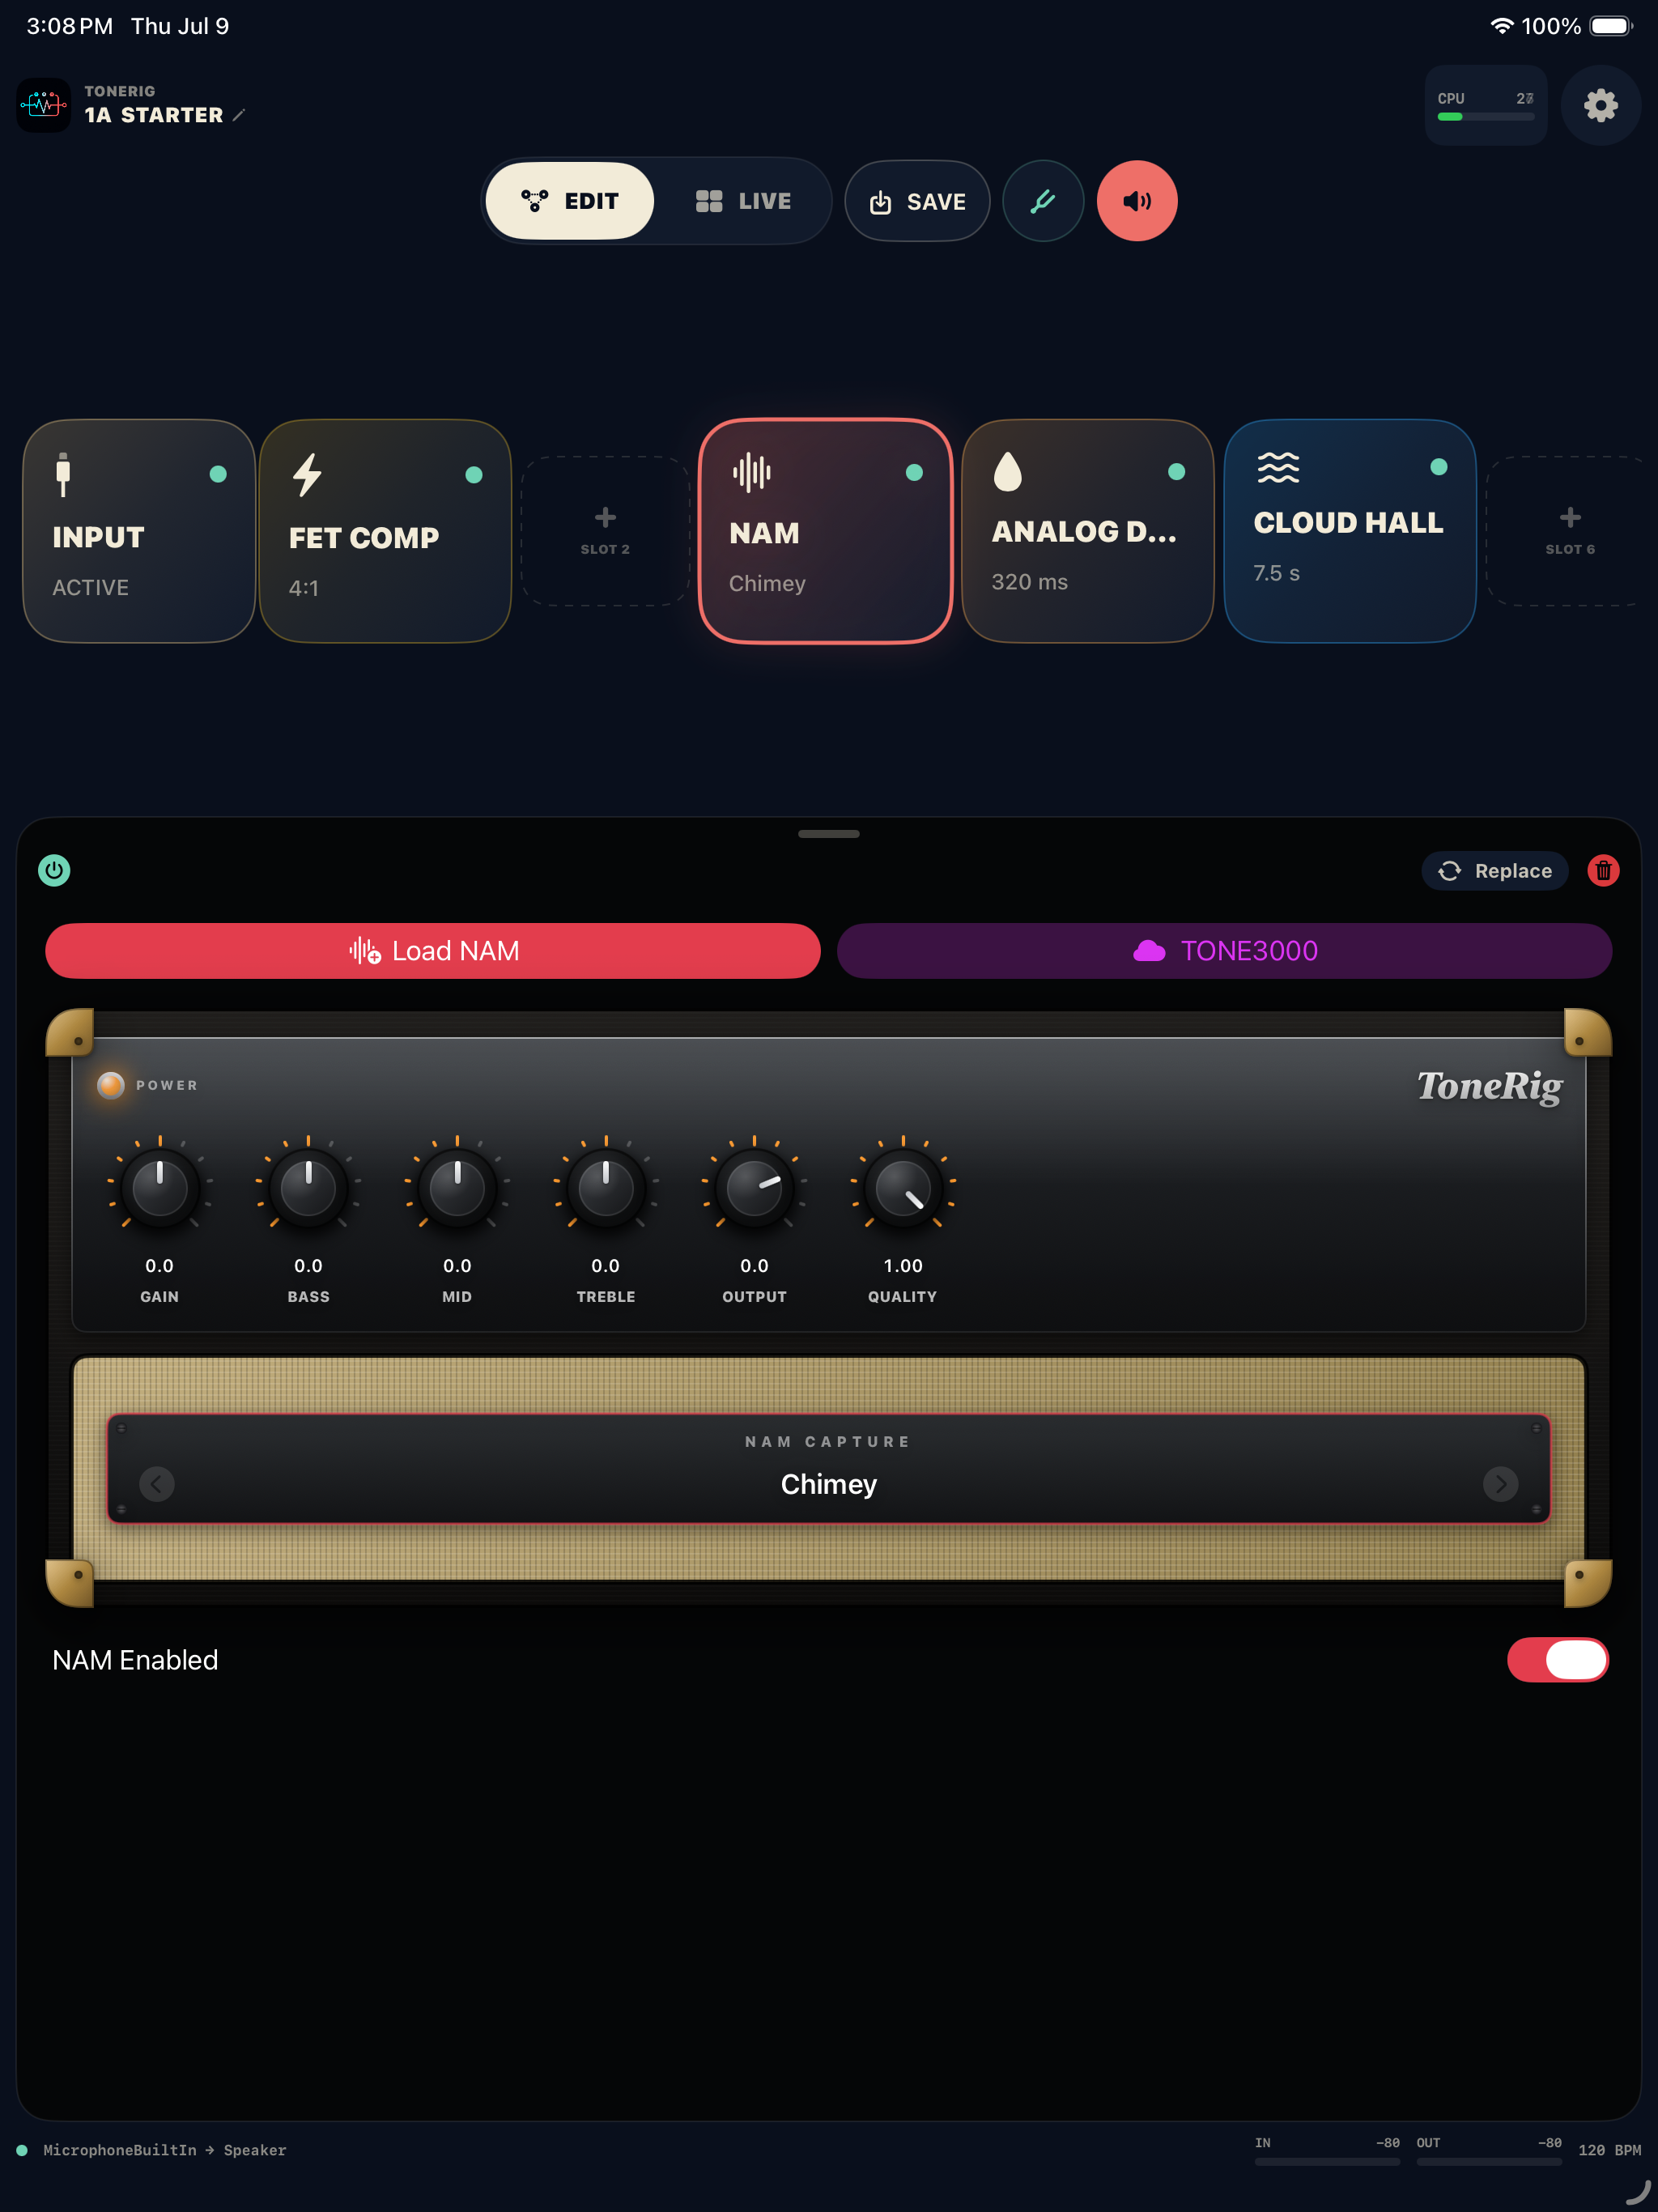
The chain runs from a fixed Input to Output. Everything between them can be arranged around the way you play.

ToneRig Edit workspace with a reorderable signal chain and NAM controls
Tap for controls. Double-tap for bypass. Touch and hold for the full action menu.
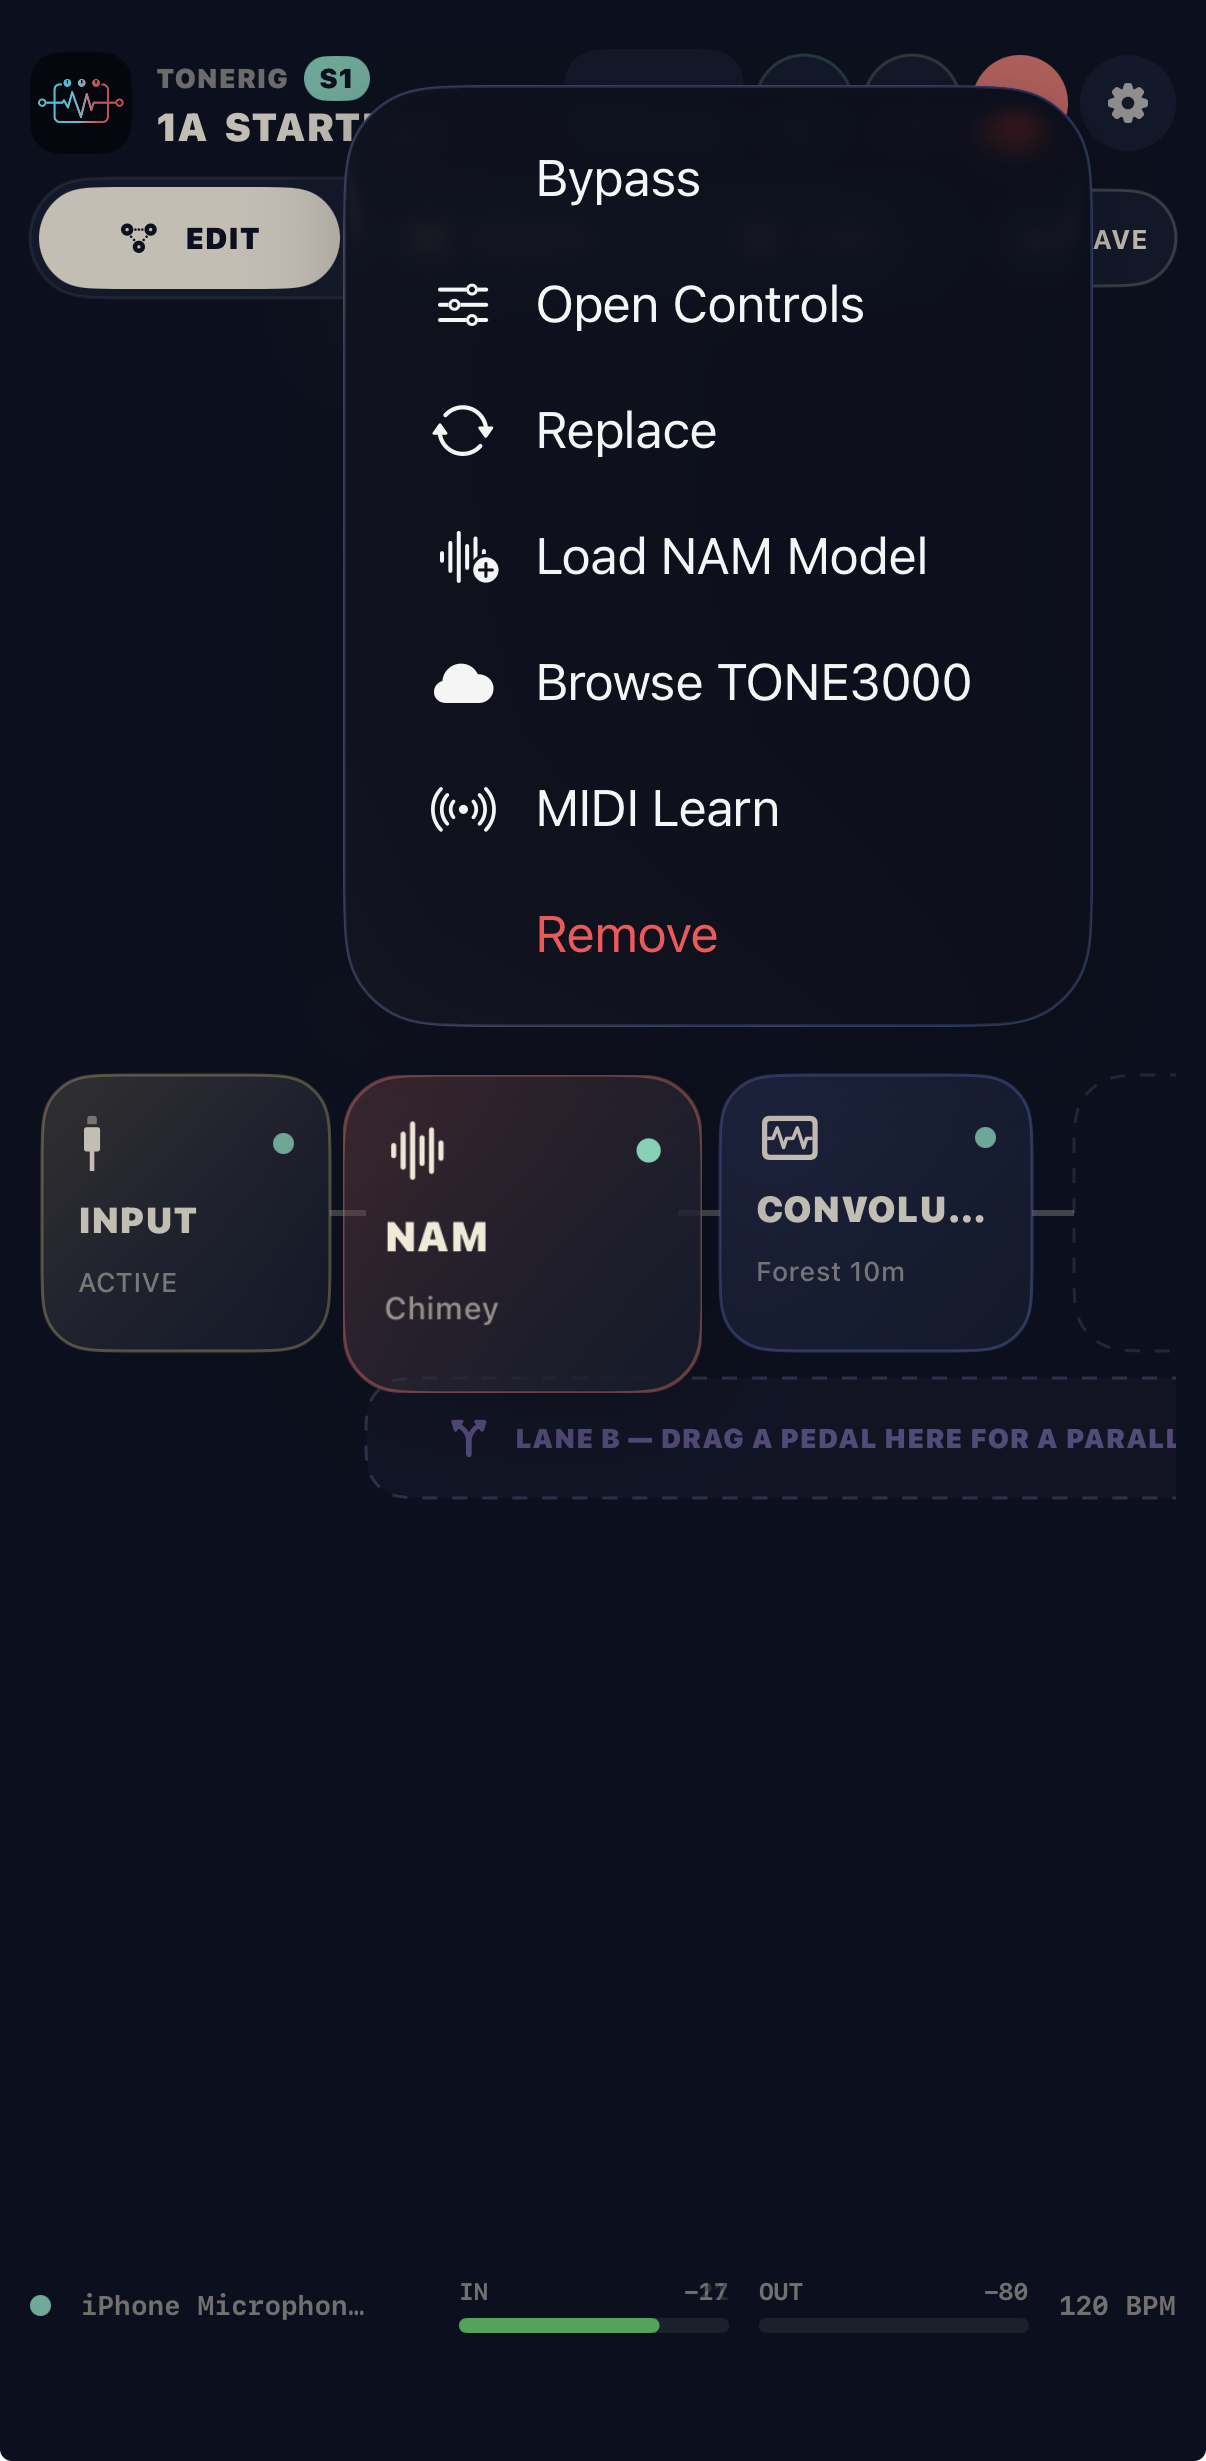
ToneRig NAM block action menu with bypass, controls, replacement, loading, MIDI Learn, and remove actions
The NAM block menu puts structural editing, loading, bypass, and MIDI Learn in one place.

Edit mode

Use Edit to add, replace, remove, reorder, and configure blocks. Tap a block to open its quick controls. Drag blocks to change the signal order. Input and Output remain fixed endpoints.

Double-tap to bypass

Double-tap any effect block to bypass or enable it without opening controls. You can also touch and hold the block and choose Bypass or Enable from the menu.

Touch and hold for more

A block's menu includes Open Controls, Replace, MIDI Learn, and Remove. NAM blocks also expose Load NAM Model and Browse TONE3000; Cab IR and Convolution Reverb blocks expose their matching libraries.

Parallel routing

Insert a split and merge to create a second lane. The split can copy the signal, balance the lanes, or divide frequencies at a crossover. Set level and pan for both lanes at the merge, then save the complete route with the preset. Parallel routing is standalone-only in the current AUv3 version.

Output level and master trim

Tap the Output endpoint for its level in dB, saved with the preset and snapshot so each preset recalls its own balance, plus a Mono Output switch that sums left and right for a single interface output. The separate Master Output is a global trim that rides on top of every preset — set it once for the room without editing each preset.

Hide unused slots

Settings → Chain → Hide Empty Blocks packs the chain down to the blocks in use plus one open add slot. When every slot is full, the add slot disappears.

Quality and CPU

A2 NAM captures can use a per-preset quality value. Settings → NAM Quality can override every compatible model with one global quality level. Lower values reduce CPU use; turn the override off to return to each preset's saved value.

03

NAM, IRs, and effects

Load the amp and cabinet first, then use the rest of the chain as a real pedalboard.

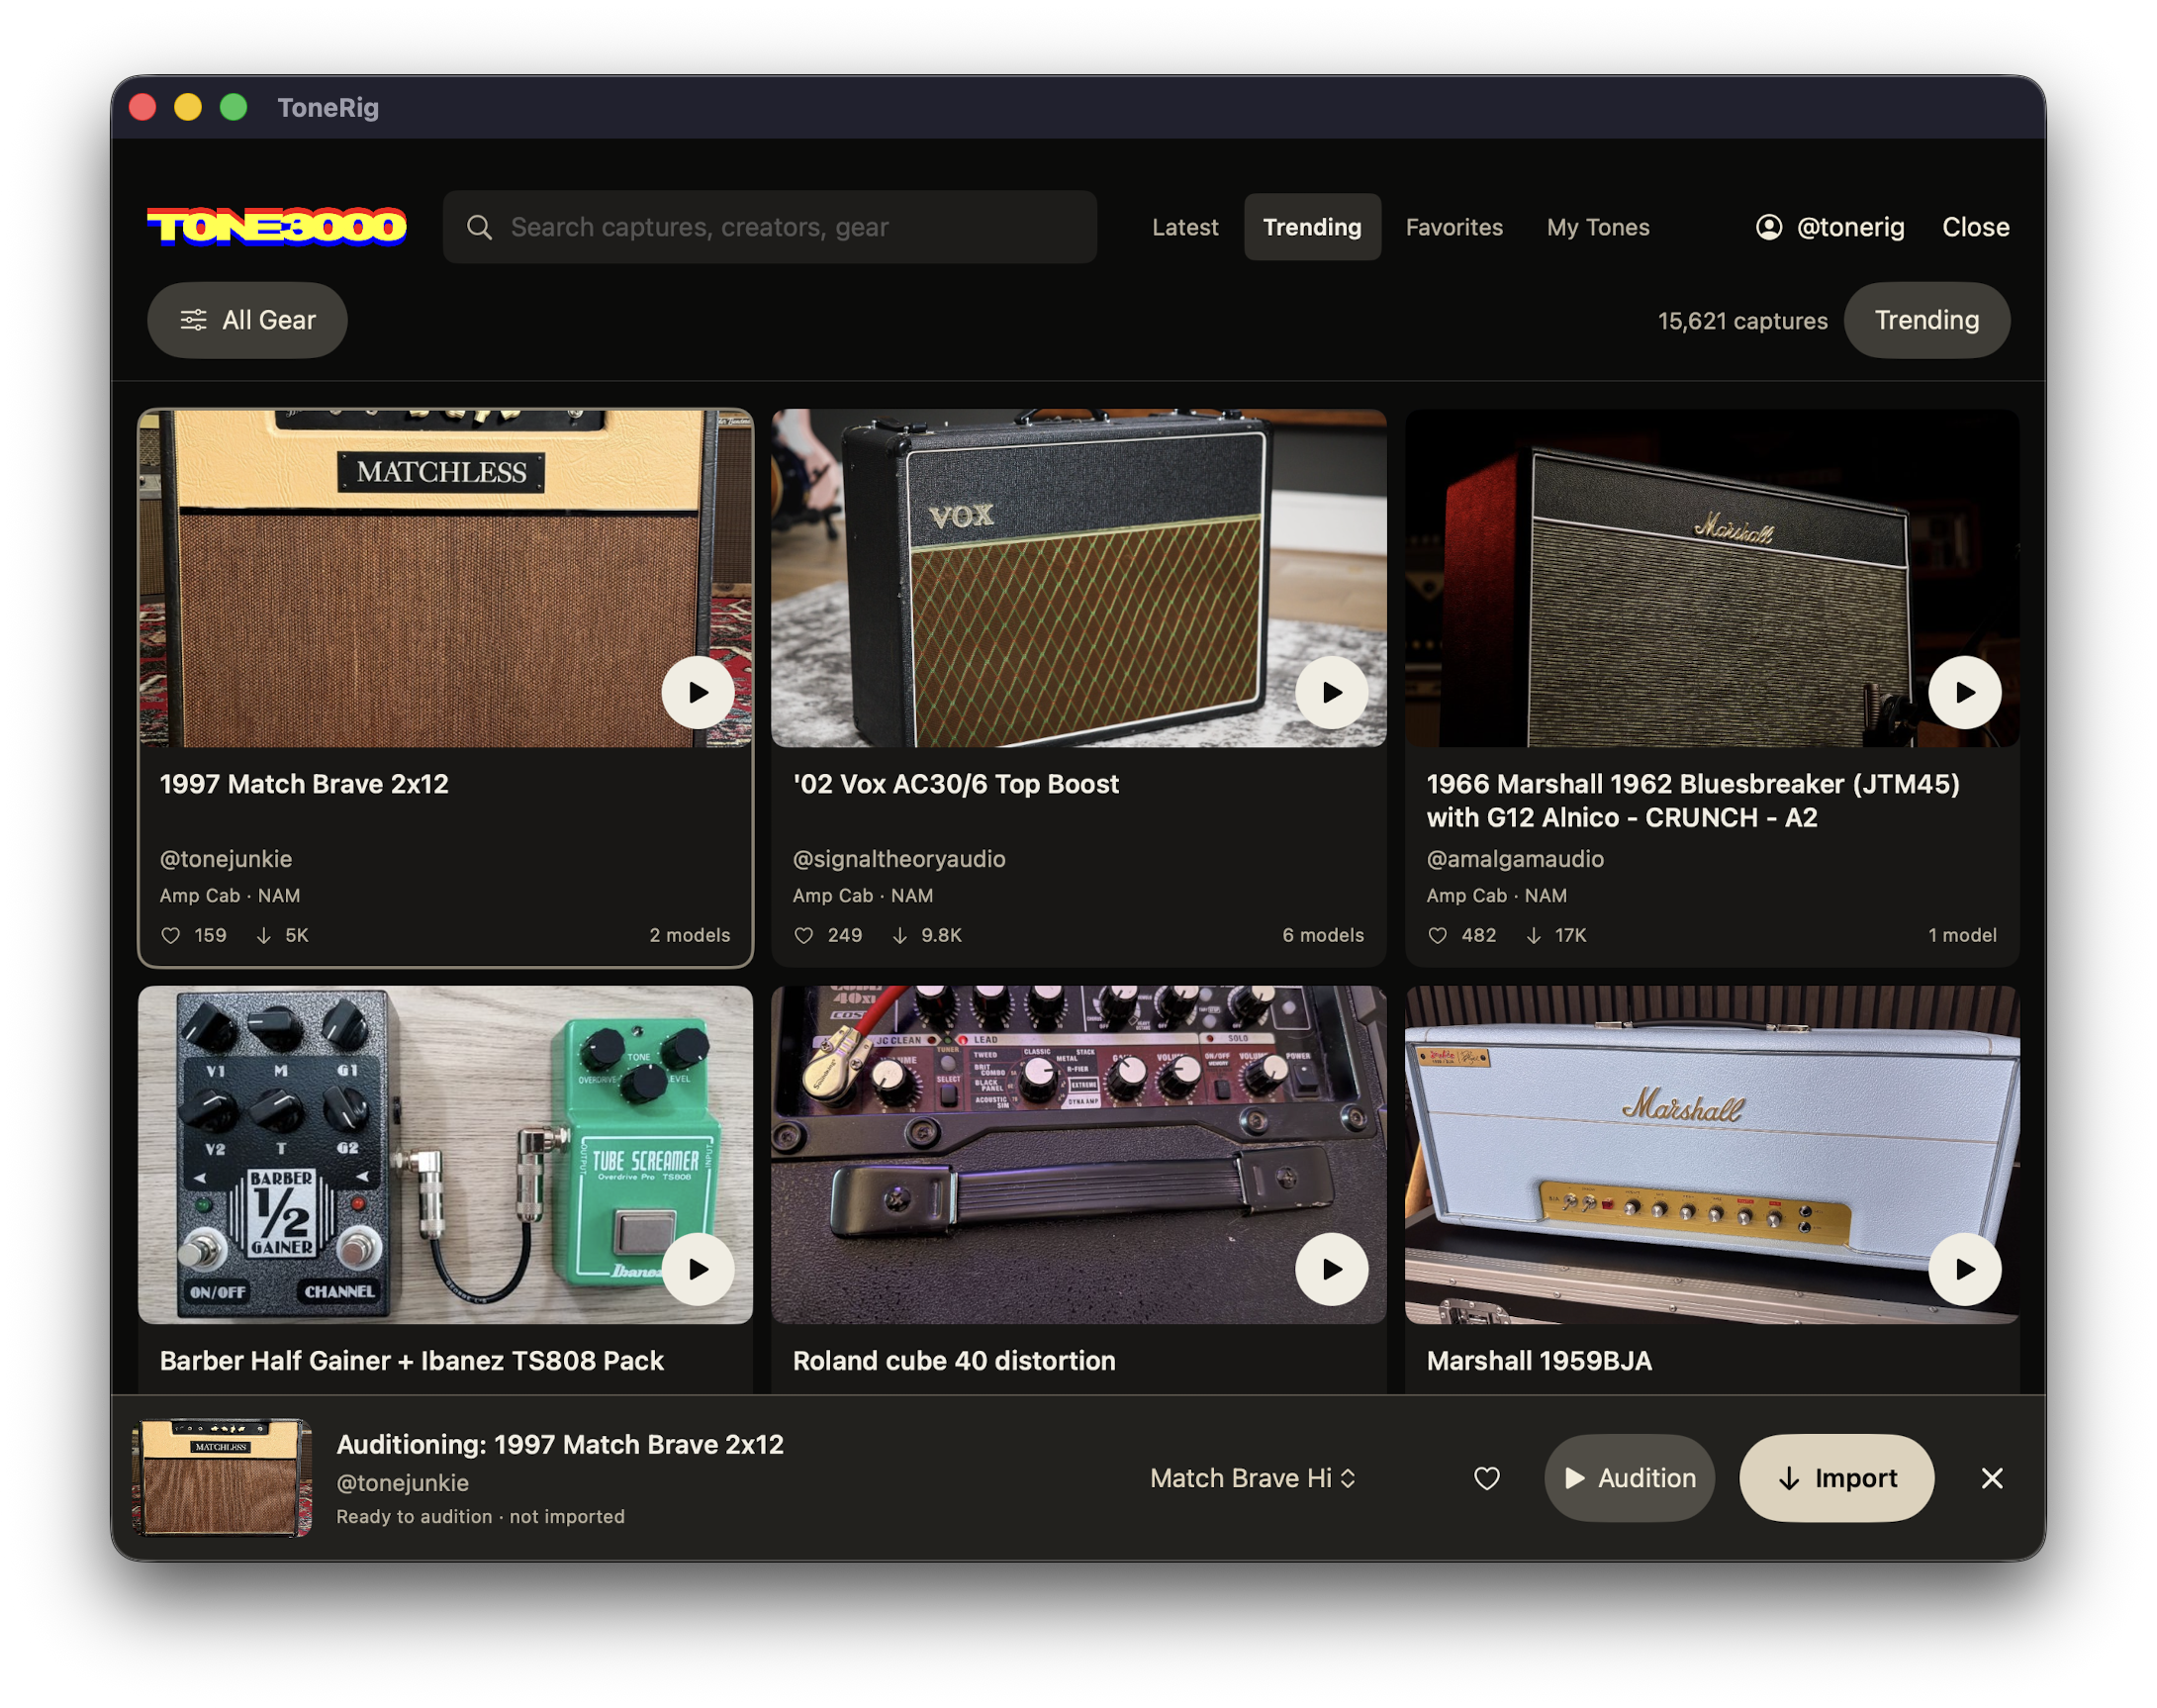
ToneRig native TONE3000 catalog showing search, feeds, capture cards, audition controls, and import
Search the full catalog, audition a specific model through the current rig, then import one model or the complete pack.
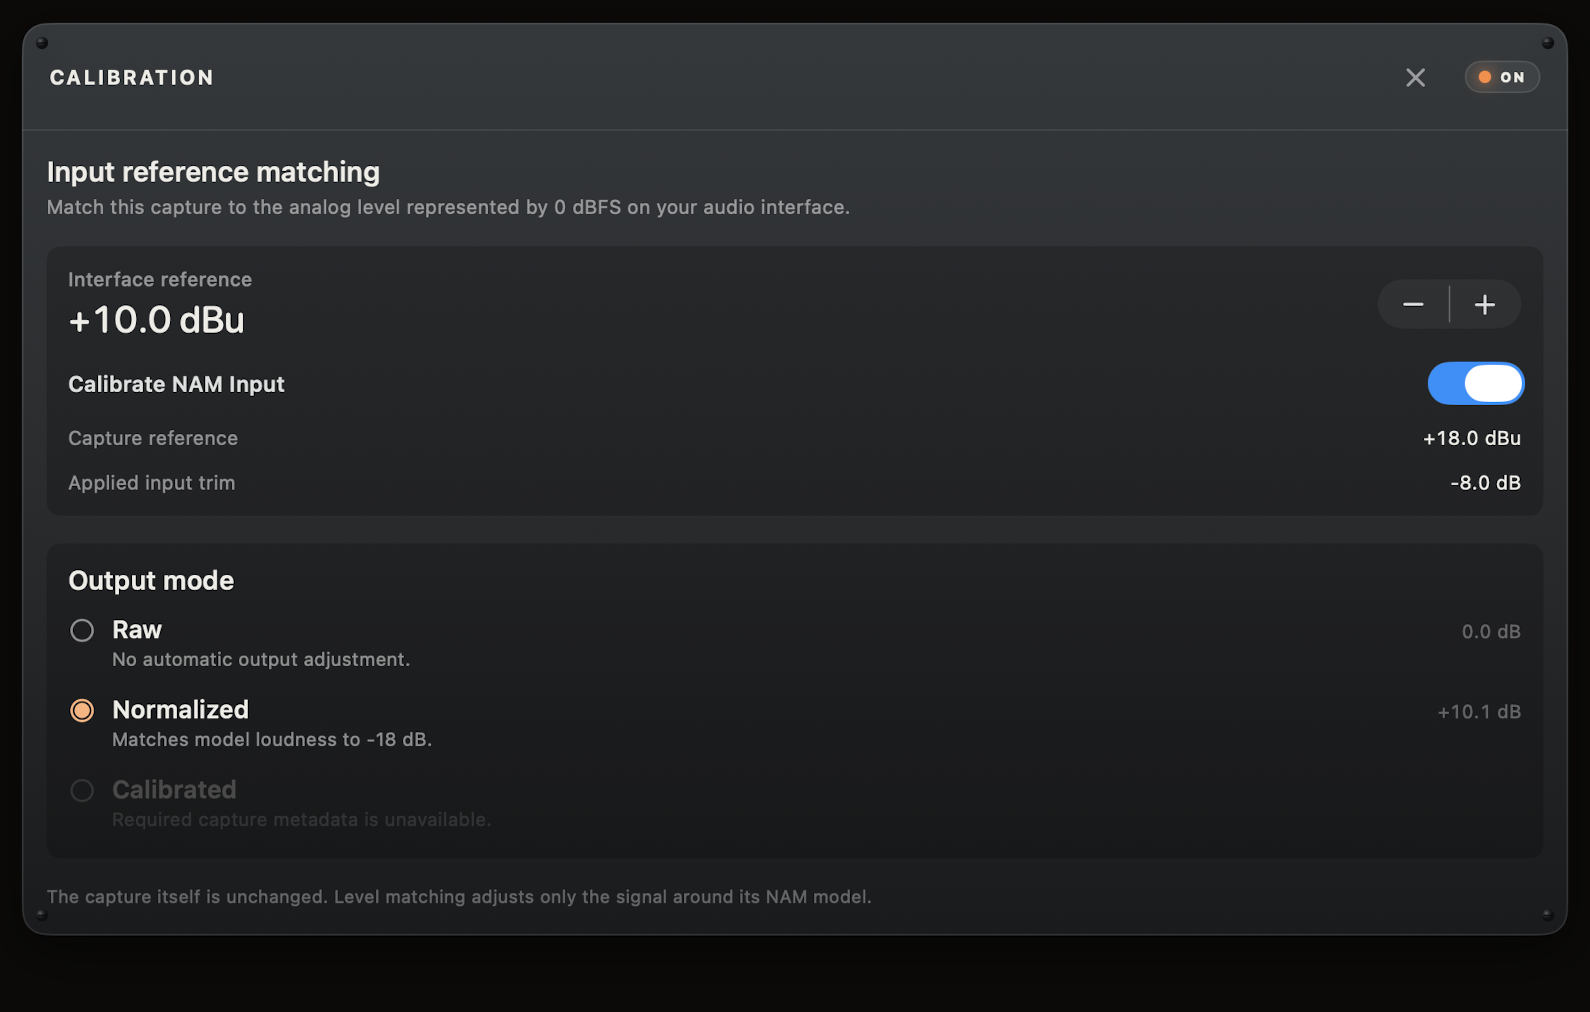
ToneRig NAM Calibration panel showing interface and capture references, applied input trim, and output modes
Calibration matches the interface and capture references around the model; the NAM file itself is never altered.
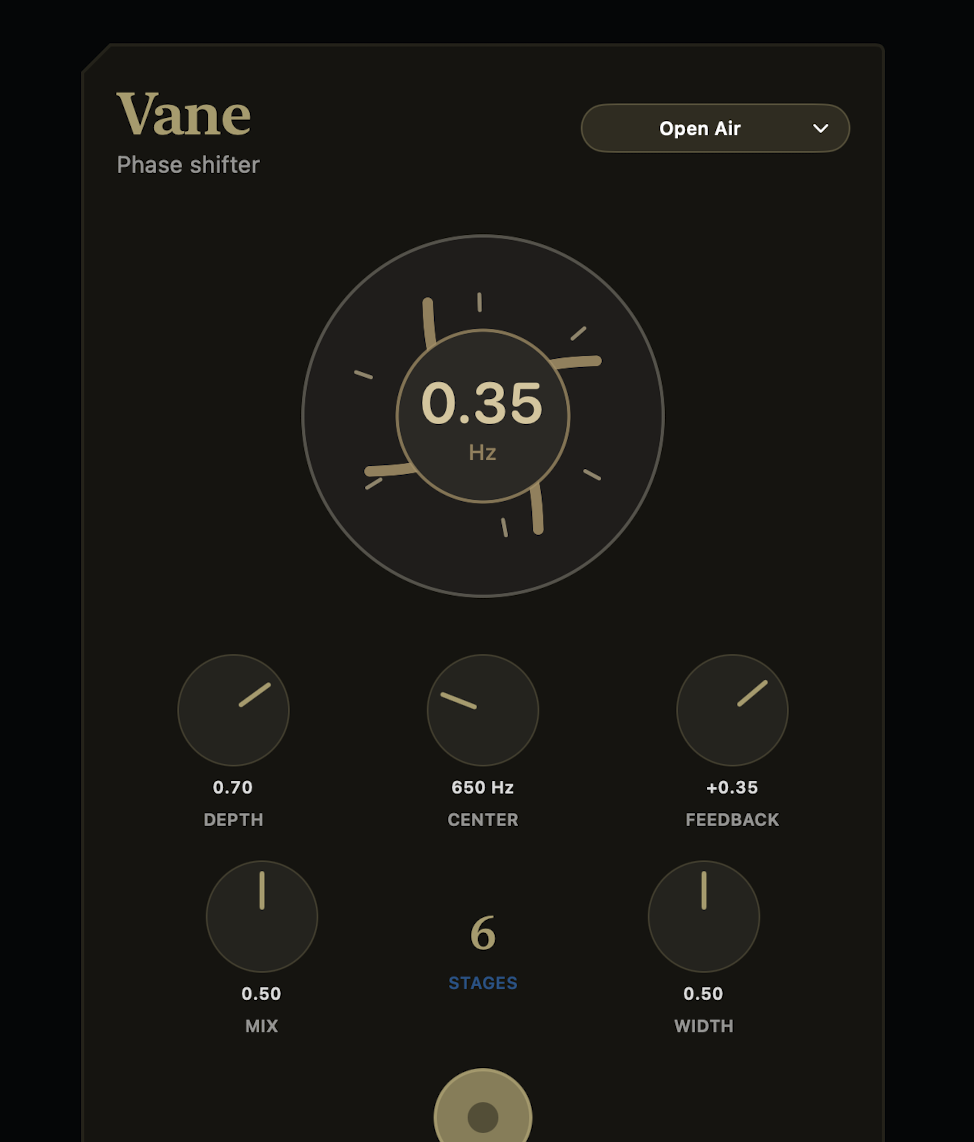
ToneRig VANE Phaser controls with animated sweep display, stage count, rate, depth, center, feedback, mix, and width
VANE pairs 4–12 phase stages with an animated stereo sweep.
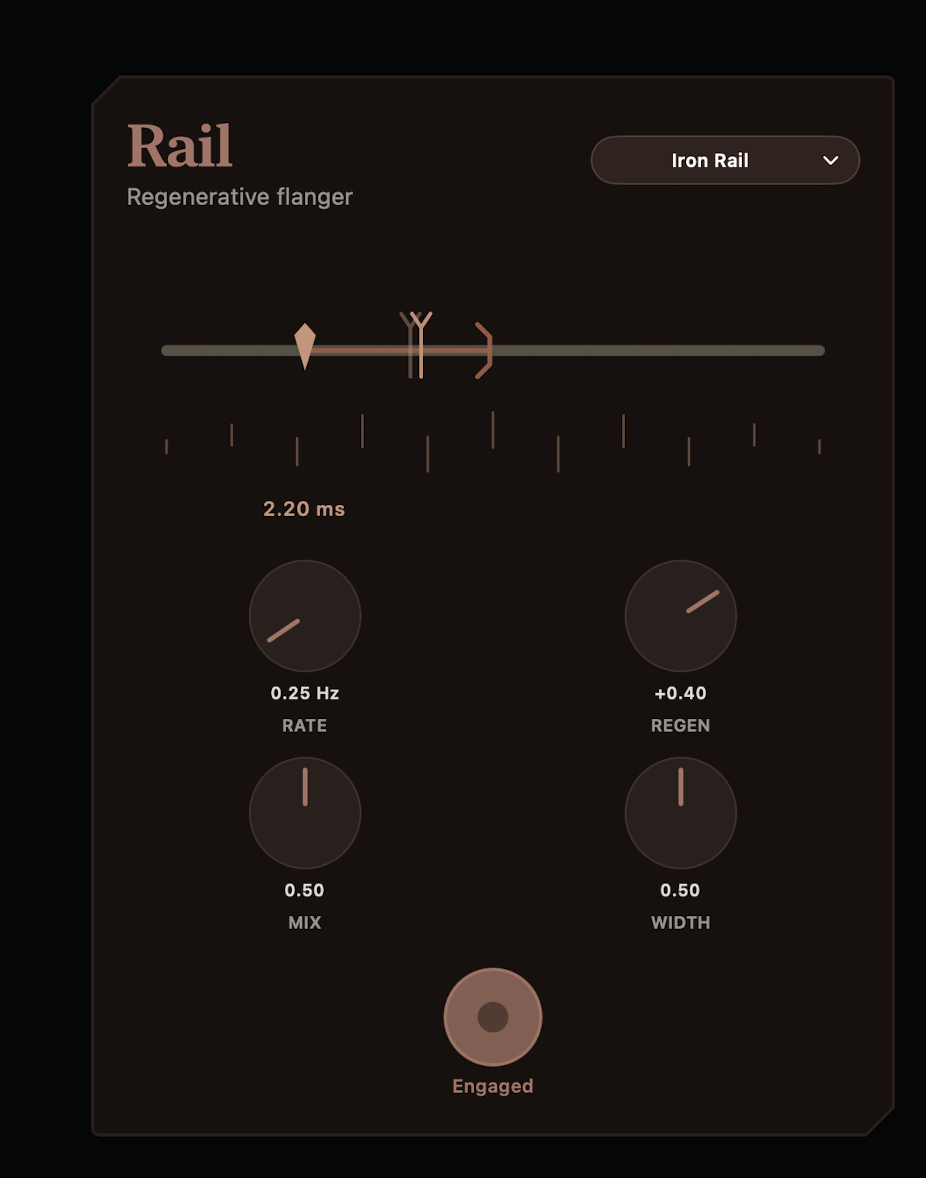
ToneRig RAIL Flanger controls with interactive delay rail, rate, regeneration, mix, and width
RAIL makes the flanger's base delay and moving modulation visible.

Load a NAM capture

Add or select a NAM block, then choose Load NAM to import a .nam file from Files. The library keeps imported captures available for other presets. Compatible A2 captures expose an adjustable quality control.

Browse TONE3000

From a NAM or Cab IR block, open the native TONE3000 catalog. Browse Latest, Trending, Favorites, or My Tones; search captures, creators, and gear; and narrow the results with the gear filter. Select a capture to choose an individual model, audition it through the current rig without importing it, then import that model or the complete pack. Cabinet IRs can be auditioned and imported from the same catalog. Closing the audition bar restores the exact block that was active before the preview.

Calibrate NAM levels

Open a NAM block's Calibration panel and set the interface reference to the analog input level that your interface maps to 0 dBFS. When a capture includes its own input reference, Calibrate NAM Input shows that reference and applies the difference as input trim without changing the capture file. Output mode offers Raw for no adjustment, Normalized to match model loudness to -18 dB, and Calibrated when the capture provides the metadata needed to reproduce its referenced output level.

Cabinet and room IRs

Cab IR accepts mono WAV impulse responses and pairs naturally after a NAM block. Convolution Reverb includes 17 bundled spaces and can import room IRs, visualize and trim the response, set pre-delay, balance early and late energy, change width, and shape the output EQ.

Organize libraries

Import individual files or whole folders. Packs in the NAM and IR browsers can be expanded or collapsed together and deleted with confirmation. A pack that contains a file currently used by the signal chain is kept until the file is no longer loaded.

Built-in effects

The current pedalboard includes FET and opto compressors, parametric EQ, wah, Auto Filter, chorus, tremolo, octaver, Auto Swell, VANE Phaser, RAIL Flanger, a Volume utility, digital delay, analog delay, tape delay, reverse delay, algorithmic reverb, modulated reverb, and convolution reverb, alongside NAM and Cab IR blocks.

VANE Phaser

VANE is a stereo phase shifter with 4-, 6-, 8-, and 12-stage modes. Rate sets the sweep speed, Depth its movement, Center the frequency range, and Feedback the amount of phased signal fed back into the effect. Mix blends dry and processed sound, while Width moves from mono to a wider stereo sweep. The animated vane display follows the modulation in real time.

RAIL Flanger

RAIL is a regenerative stereo flanger. Drag the marker on the rail to set the base delay in milliseconds, then use Rate for sweep speed and Regen for the amount and direction of feedback. Mix balances dry and flanged sound, and Width controls the stereo spread. The rail visualization shows the delay and modulation moving around the fixed reference point.

Volume block

Drop a Volume block anywhere in the chain to set level as a 0–100% control, with 100% as unity gain. Choose a Linear curve for even, predictable travel or a Logarithmic curve that tracks how the ear hears loudness, then bypass or engage it like any other block.

Auto Swell

Auto Swell fades each note in on its own and swallows the pick attack, giving a bowed, violin-like sound — like riding a volume pedal, hands-free. Trigger sets how loud a note must be to start a swell, and Attack sets how long it takes to reach full volume. Reset sets how far the signal must fall before another swell can begin, so a held note rides through without re-triggering, while Fall sets how long the note fades back to silence once it ends. Curve shapes the climb from a fast-then-slow rise to a slow, blooming swell, and Output adds make-up gain after the effect. Mode picks how quickly it re-arms between notes: Fast re-swells in the gaps of quick lines, while Slow rides through sustained passages. Like the other larger effects, it includes factory presets and saves your own named settings.

Auto Filter

Auto Filter is an envelope-controlled filter — an auto-wah that sweeps a resonant filter with your picking dynamics. Sens sets how hard your attack opens the filter and Range sets how far it sweeps, while Reso sets the resonance for anything from a gentle vowel to a sharp, quacky peak. Attack and Release control how quickly the filter follows your playing up and back down. Mode chooses a low-pass, band-pass, or high-pass character, and Direction sweeps the filter up as you dig in or down for a reverse-style vowel. Mix blends the filtered sound against the dry input, and Level trims the output. Like the other larger effects, it includes factory presets and saves your own named settings.

Effect presets

Larger built-in effects include factory presets and let you save your own named settings. Reusing a user-preset name overwrites it case-insensitively. Changing a control after recall marks the selection as Custom; your own presets can also be deleted.

Third-party AUv3 effects

ToneRig Pro can host installed AUv3 effects as blocks in the standalone chain. Pick an Audio Unit and tap its block to open the plug-in immediately in a floating, resizable window over the board; the title bar carries bypass and the bottom grip resizes the interface. On Mac, the directly distributed ToneRig Suite can also host traditional Mac Audio Units, including plug-ins the sandboxed App Store build cannot load. Nested third-party AUv3 blocks are not supported inside ToneRig's AUv3 extension.
04

Looper

Record a phrase, loop it, and stack layers on top — hands-free, up to sixty seconds.

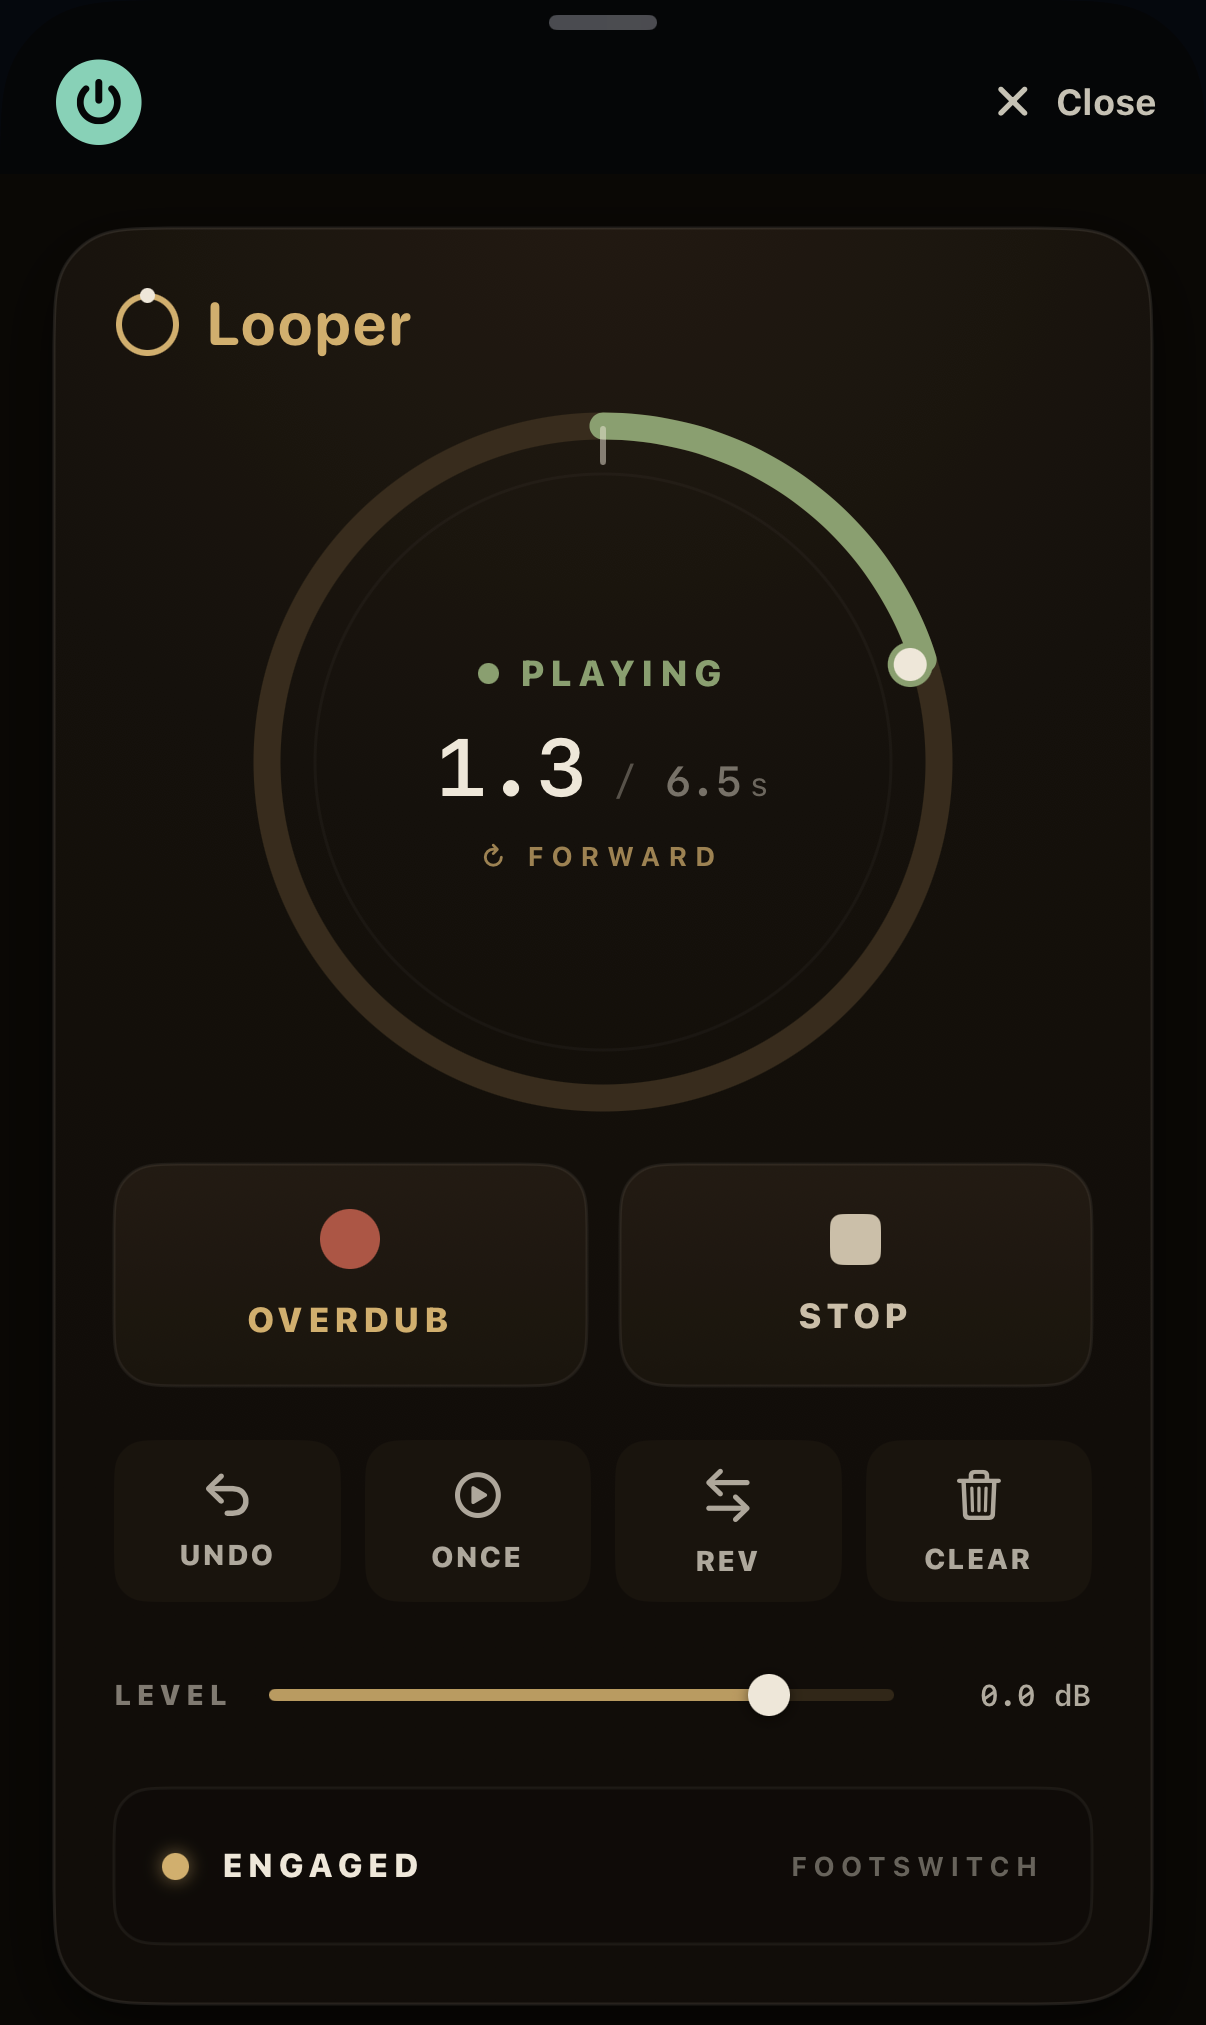
ToneRig Looper editor showing the loop ring mid-playback with overdub, stop, undo, once, reverse, clear, and a loop level control
The loop ring fills as you record and its head orbits during playback; transport and Loop Level sit below.

Add the Looper

Add one Looper block from the browser; a rig holds a single looper. Place it wherever you want to capture the sound — usually late in the chain so it records your full processed signal. Bypassing the block stops playback but keeps the recorded loop, so you can drop out and back in without losing the phrase.

Record, play, and overdub

Step on Record to start recording, then Stop/Play to close the loop and begin playback. With a loop playing, Record again to Overdub another layer on top, and Stop/Play to stop. The looper captures up to sixty seconds of stereo audio; recording past that closes the loop automatically.

Read the loop ring

The ring fills as you record and its head orbits while the loop plays, so you can watch the phrase go around. The center shows the transport state with the elapsed and total time, and the state colour changes with what the looper is doing — recording, playing, or overdubbing.

Undo, Once, Reverse, and Clear

Undo erases the most recent overdub, so a mistaken layer is one tap away. Once plays the loop a single time and stops. Reverse flips playback direction and the ring spins the other way. Clear erases the loop so you can start over.

Loop Level and Engage

Loop Level sets how loud the recorded loop sits under your live playing and can be assigned to a MIDI control. The Engage footswitch bypasses the block; because bypass only stops playback, the loop is still there when you re-engage.

Control it hands-free

Every transport control is MIDI-mappable. Open Settings, then MIDI Assignments, and expand the Looper section to learn a footswitch to Record/Overdub, Stop/Play, Undo, Play Once, Reverse, or Clear. Each command fires once per press, so a foot controller becomes a full looper pedal.

05

Presets, Snaps, and Live

Presets hold the whole rig. Snaps hold performance variations. Live turns the library into large stage-ready targets.

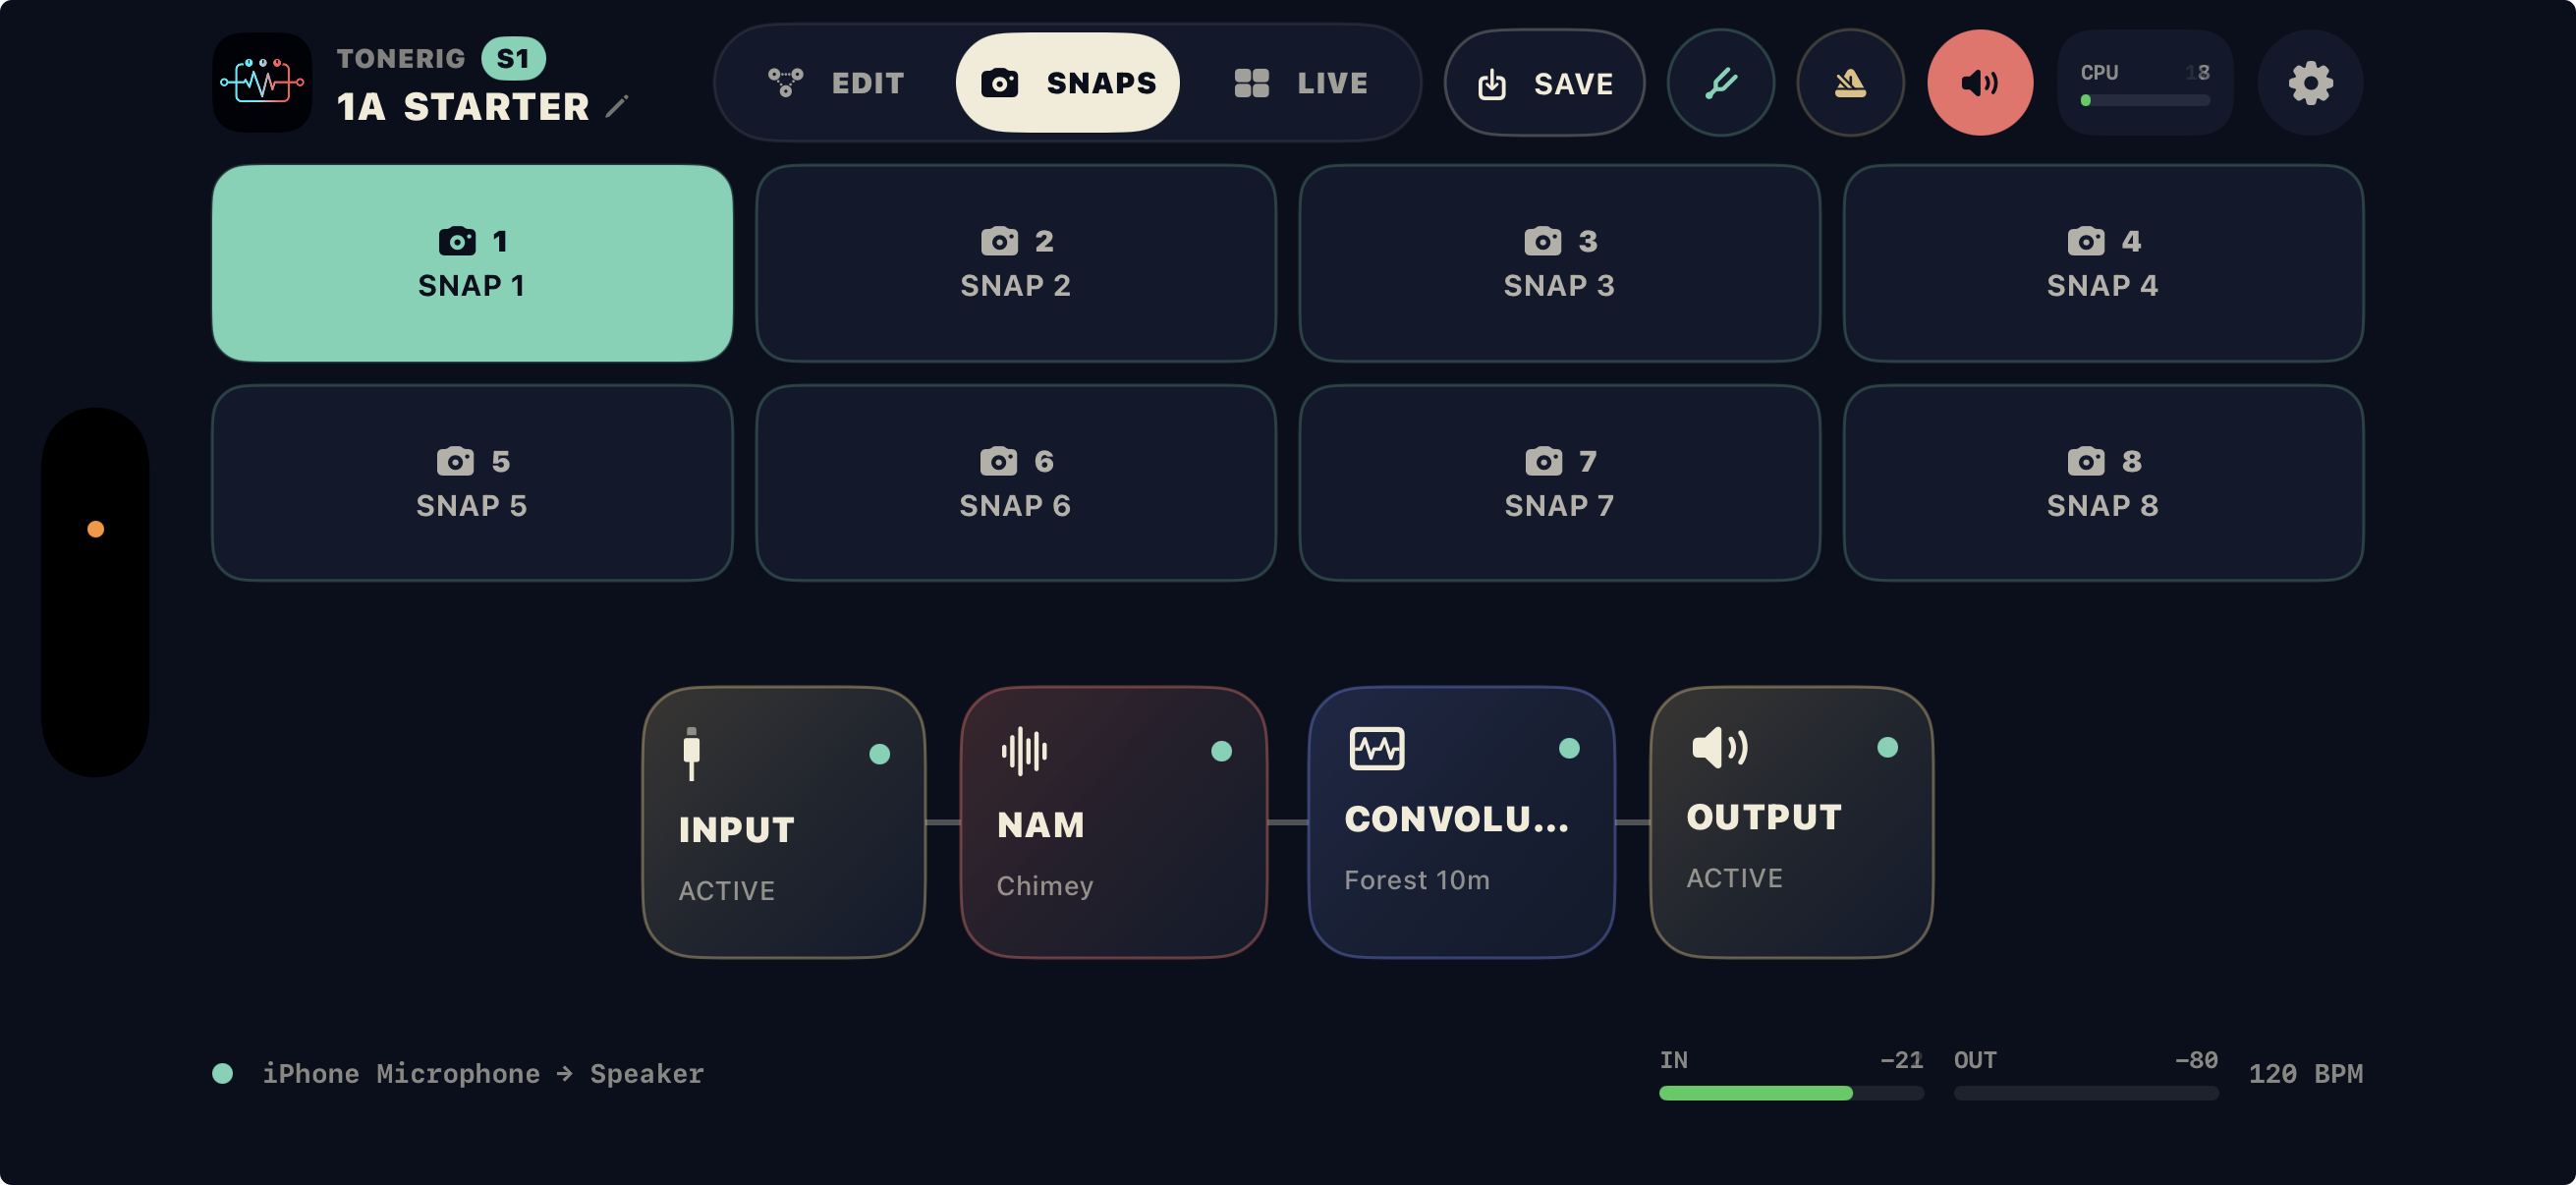
ToneRig Snaps workspace showing eight variations and the active signal chain
Eight Snaps sit above the unchanged signal chain; the active variation is always clear.
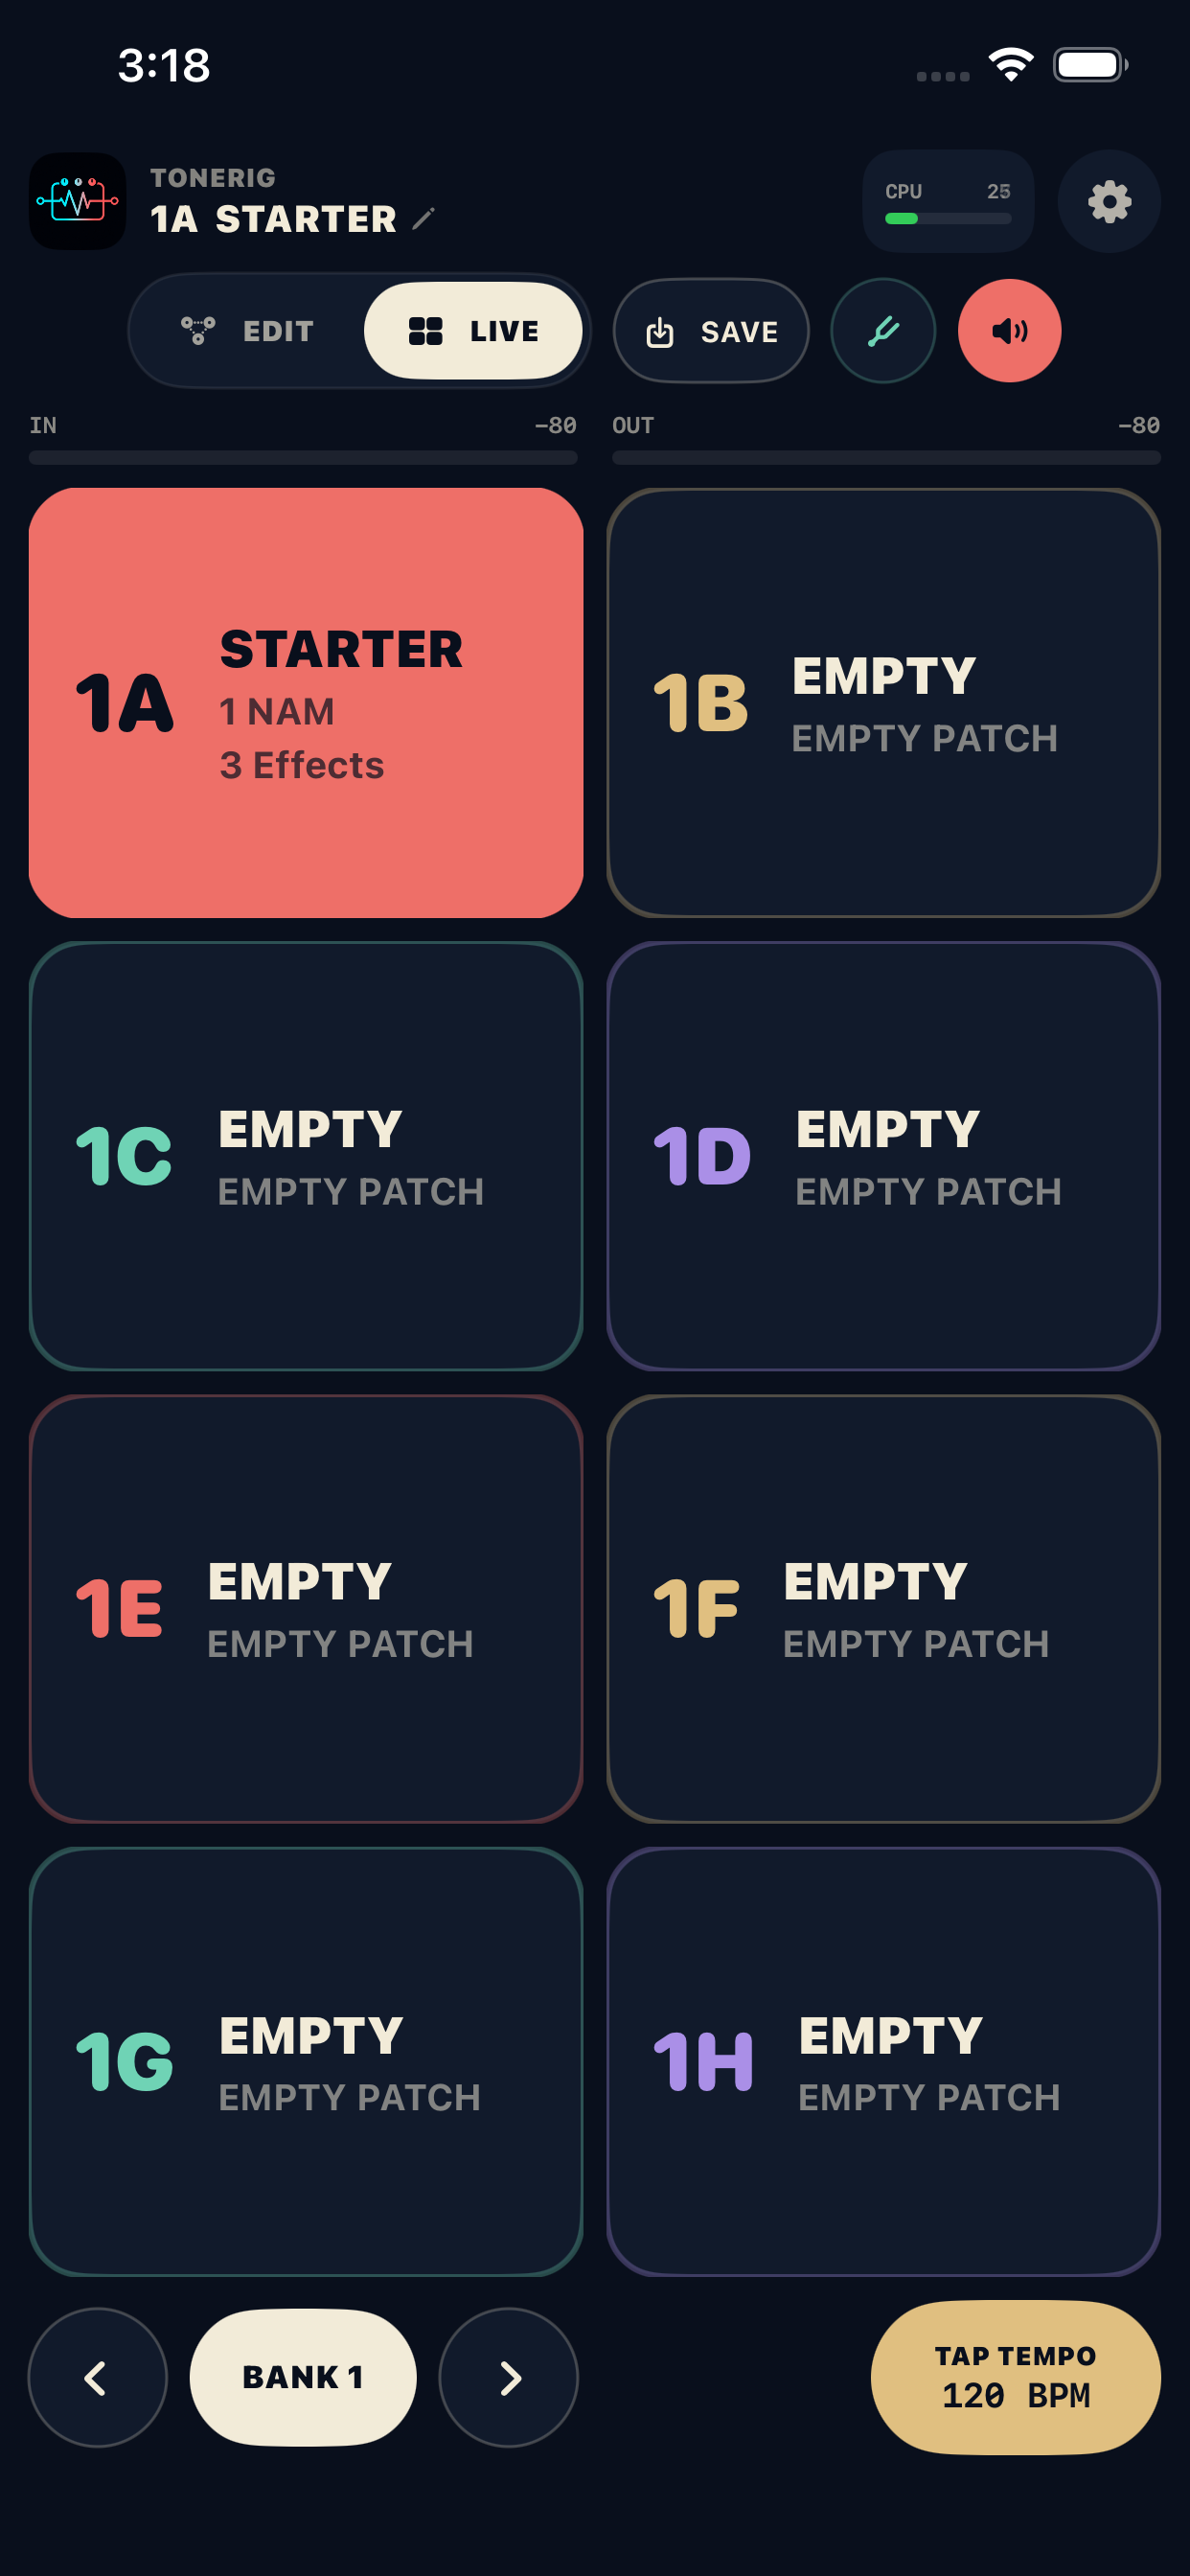
ToneRig Live mode showing eight large preset tiles
Live mode turns the bank into eight large preset targets.
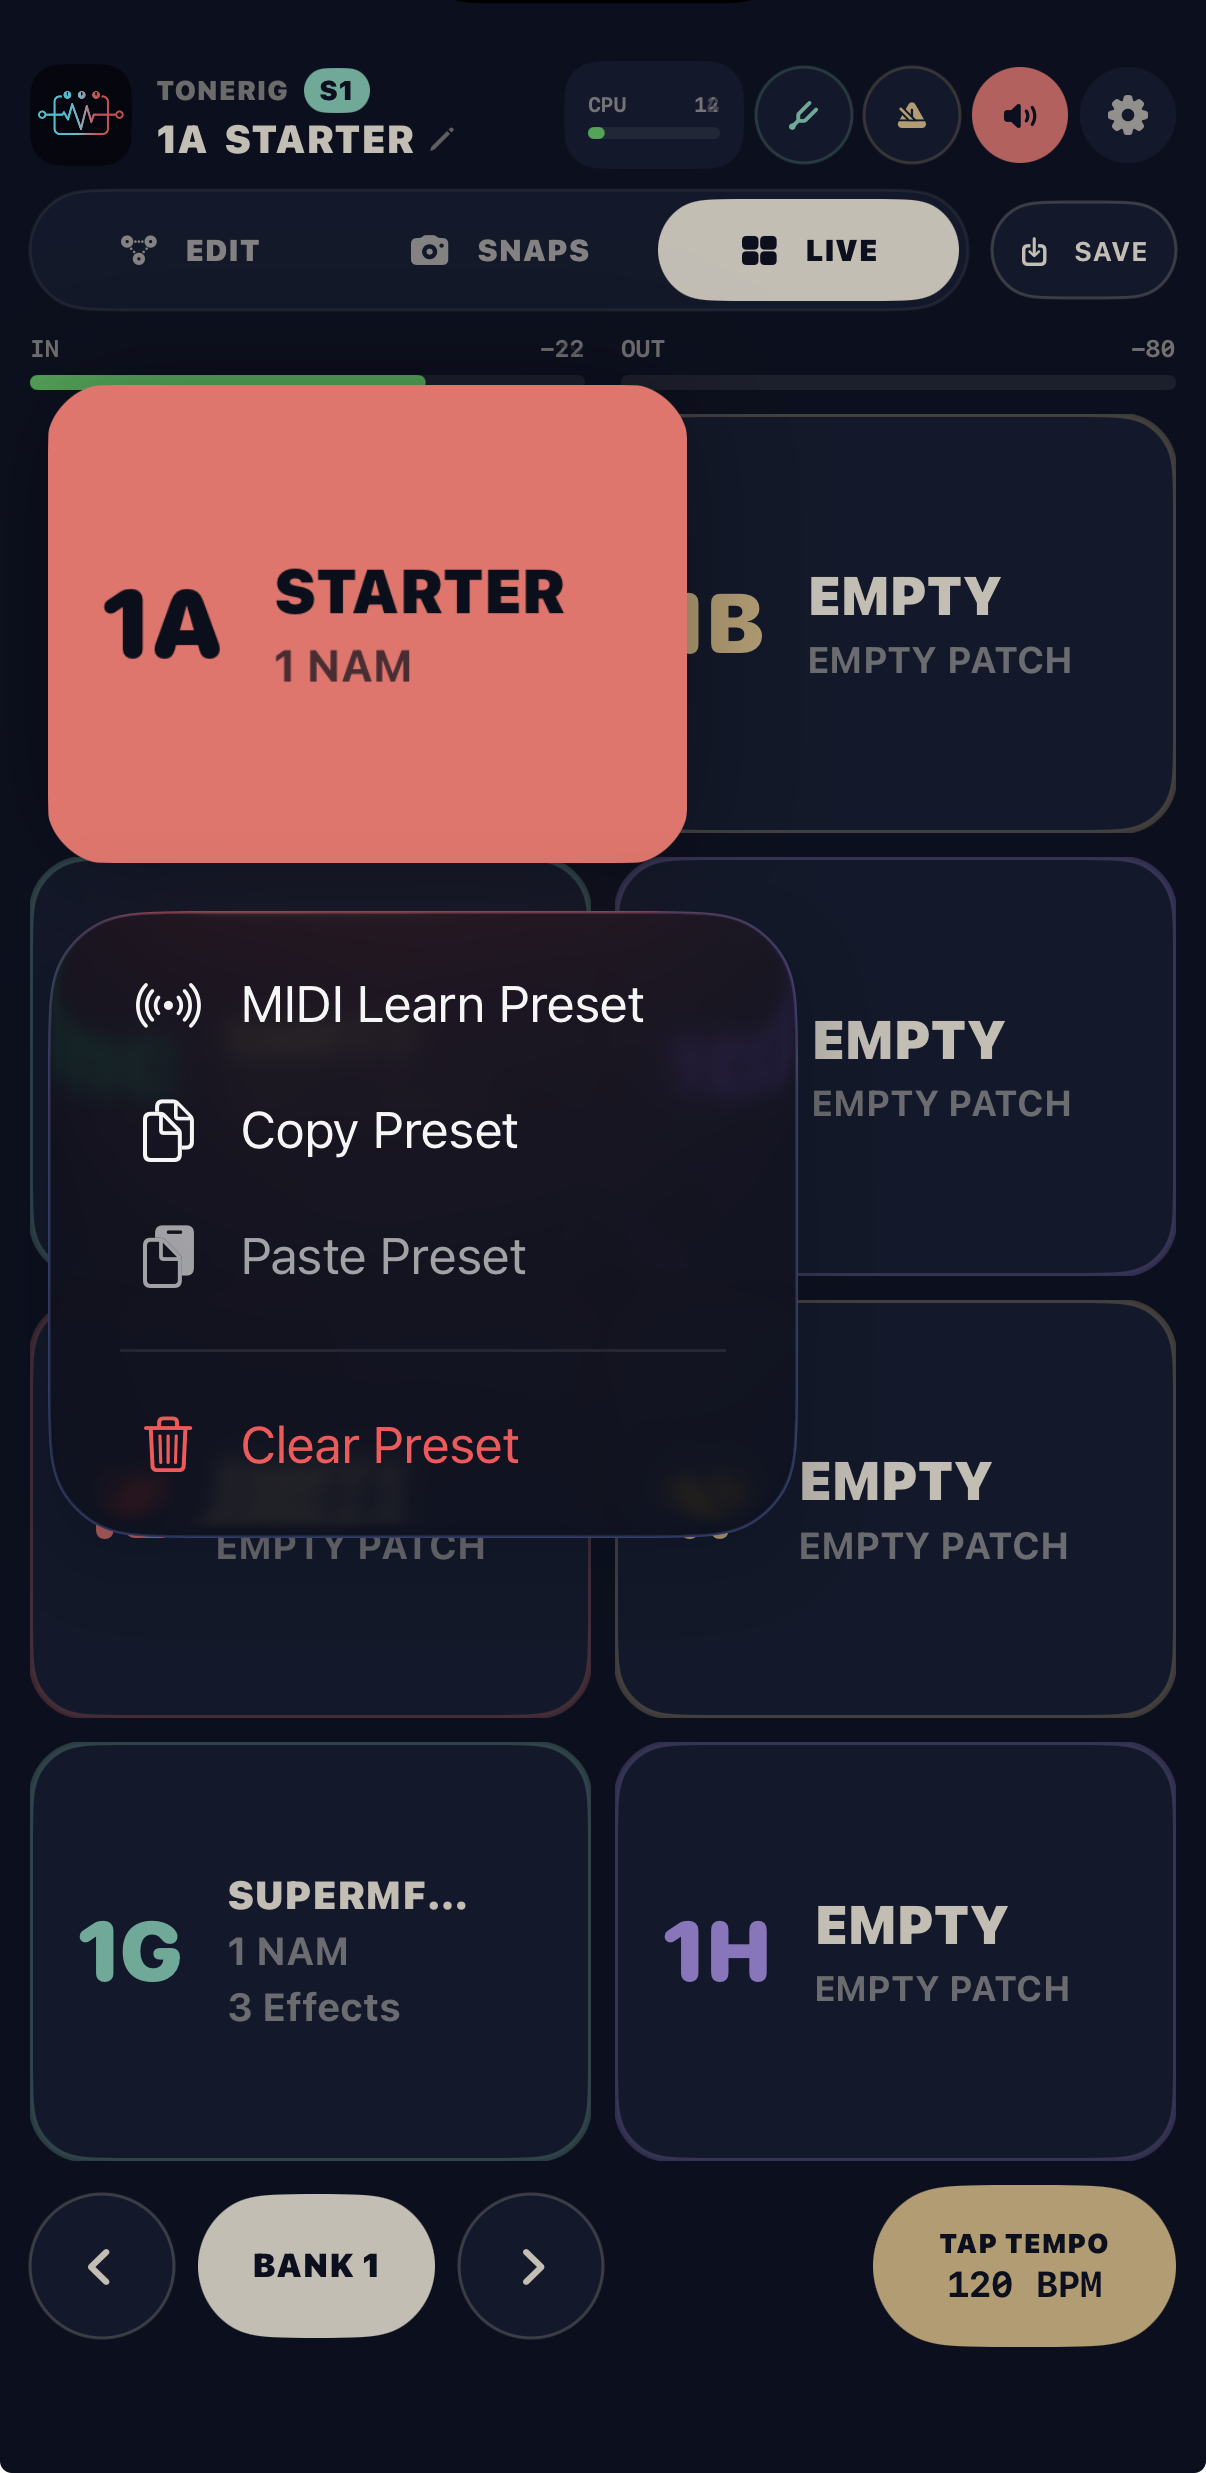
ToneRig preset menu showing MIDI Learn, Copy, Paste, and Clear Preset
Touch and hold a preset for MIDI Learn, copy, paste, or clear.
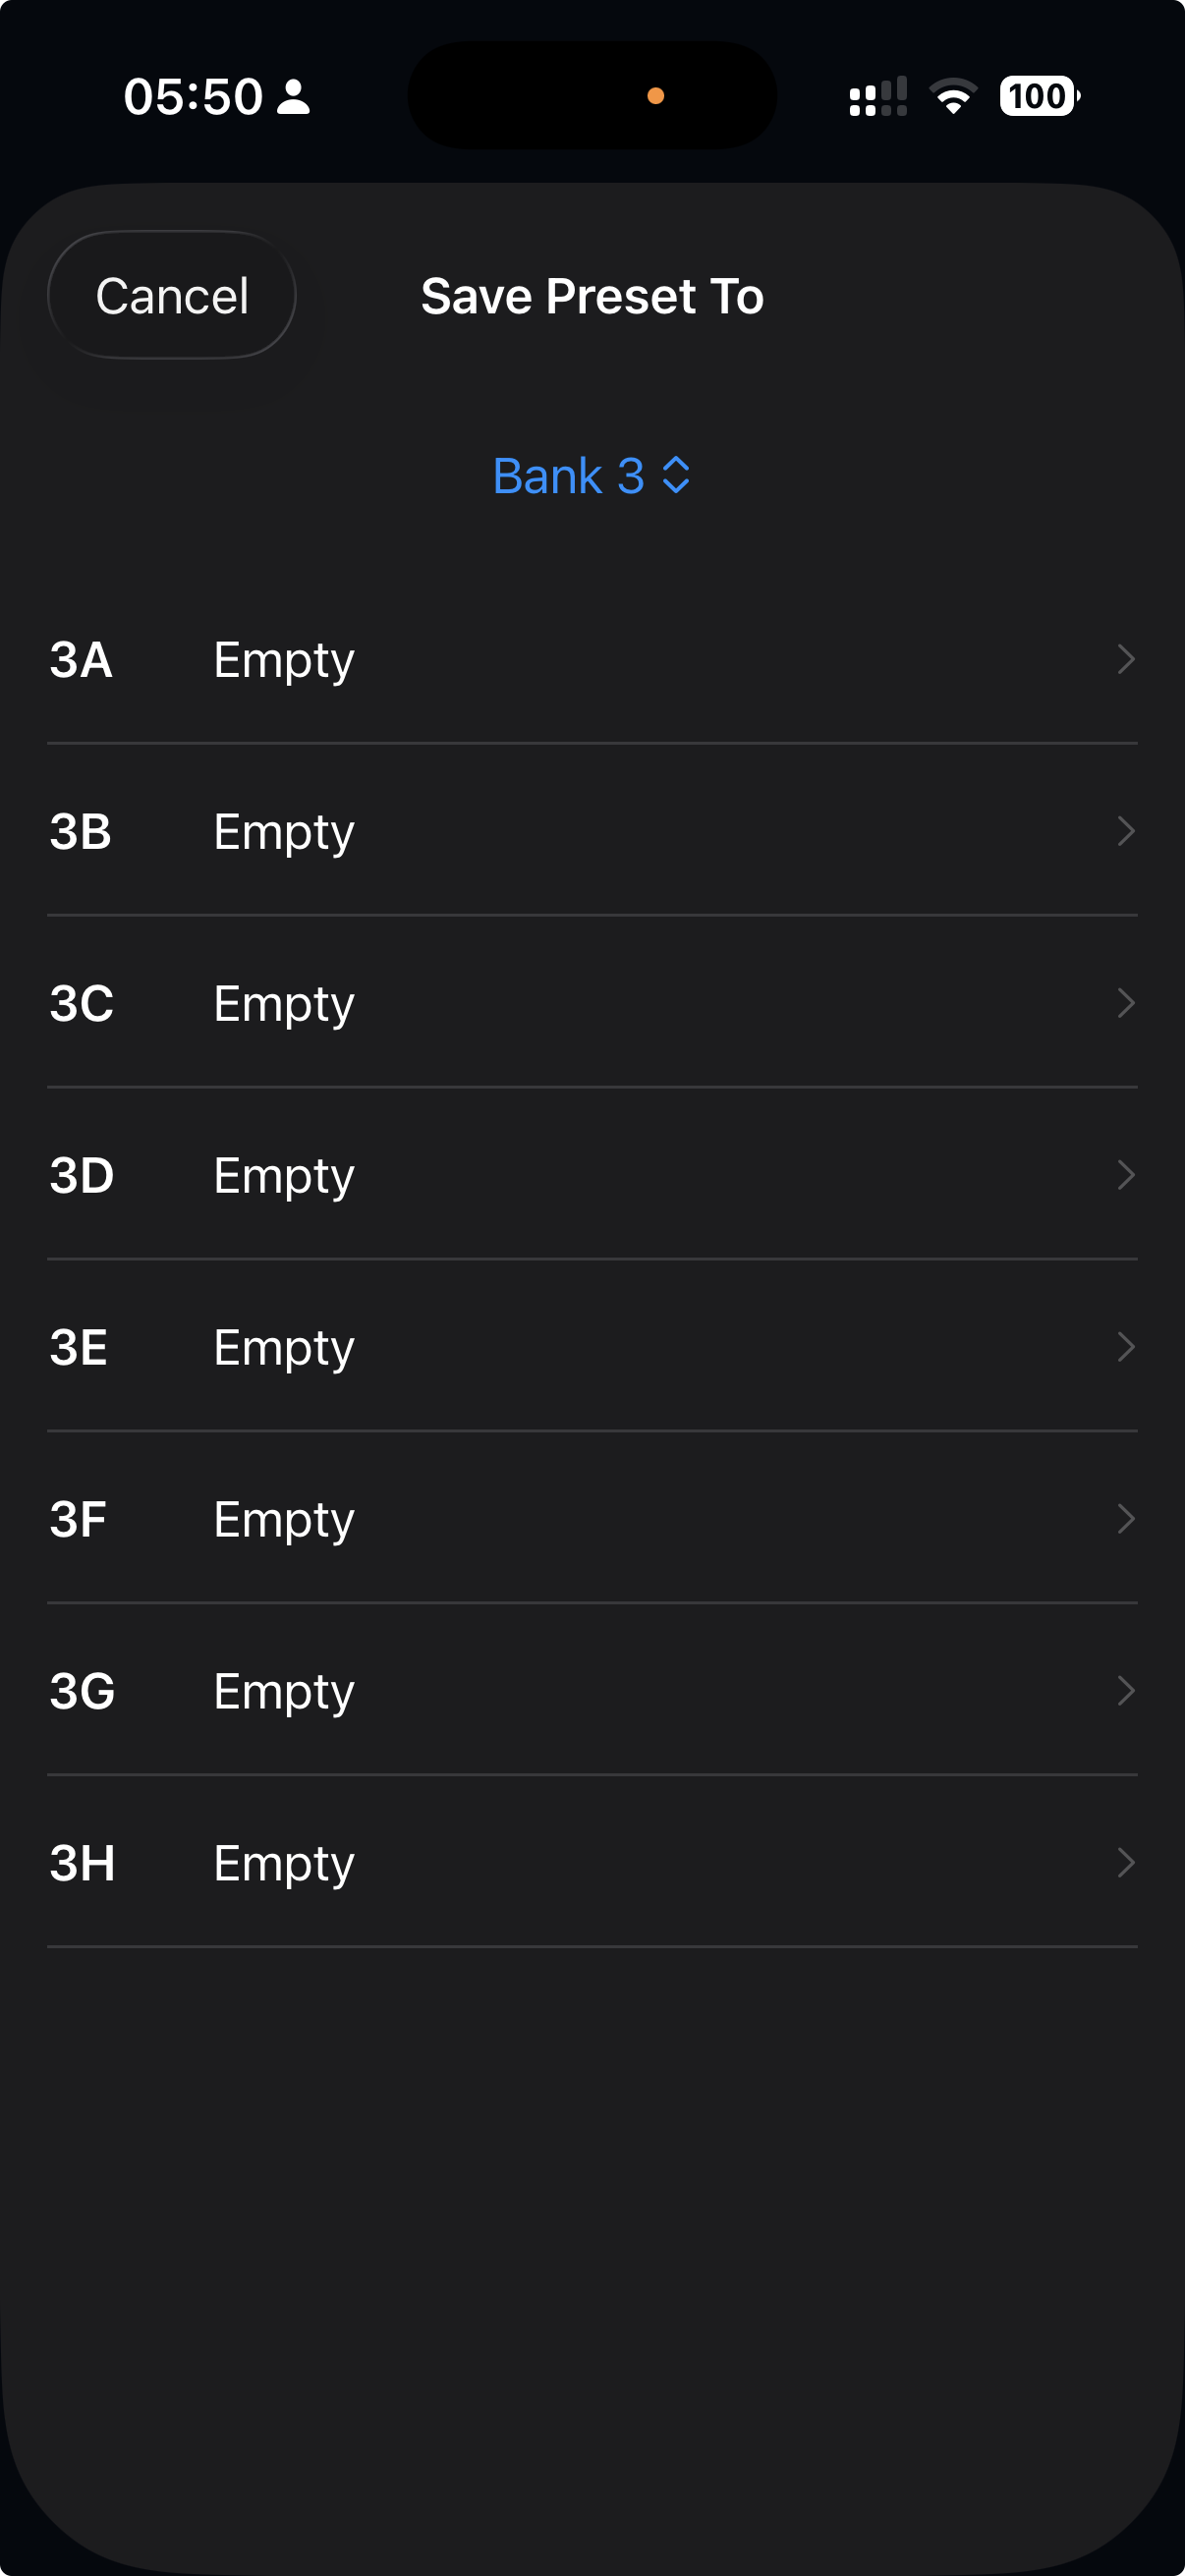
ToneRig Save Preset To picker showing all eight slots in Bank 3
Touch and hold Save to choose any bank and destination slot.

Save a preset

Tap Save to update the current slot. Touch and hold Save, then choose Save To Bank to store the current rig in any of the 16 banks and 8 slots while seeing what each destination already contains.

Copy, paste, and clear presets

Touch and hold a preset tile to Copy Preset. Touch and hold another tile and choose Paste Preset to duplicate it. The same menu can clear or reset a slot, and can start MIDI Learn for direct recall.

Reorder presets

Drag a preset tile onto another slot to move it. ToneRig keeps the bank and active preset state in sync as the tiles change position.

Eight Snaps per preset

Snaps instantly recall effect parameters, bypass states, input and output gain, tempo, and parallel split or merge settings. They do not change the effect layout or replace loaded NAM, IR, or AUv3 assets.

Rename, copy, and learn Snaps

In Snaps mode, touch and hold a Snap to rename it, start MIDI Learn Snap for direct recall, copy it, or paste a copied variation into another Snap. The active Snap stays visible in the workspace header.

Live mode

Live presents the current bank as eight large, color-coded preset tiles with summaries of loaded NAM captures, effects, and Audio Units. Use the bank controls at the bottom or MIDI to move without returning to Edit.

06

MIDI control

Use a foot controller for direct recall, performance switching, bypass, tempo, and continuous parameters.

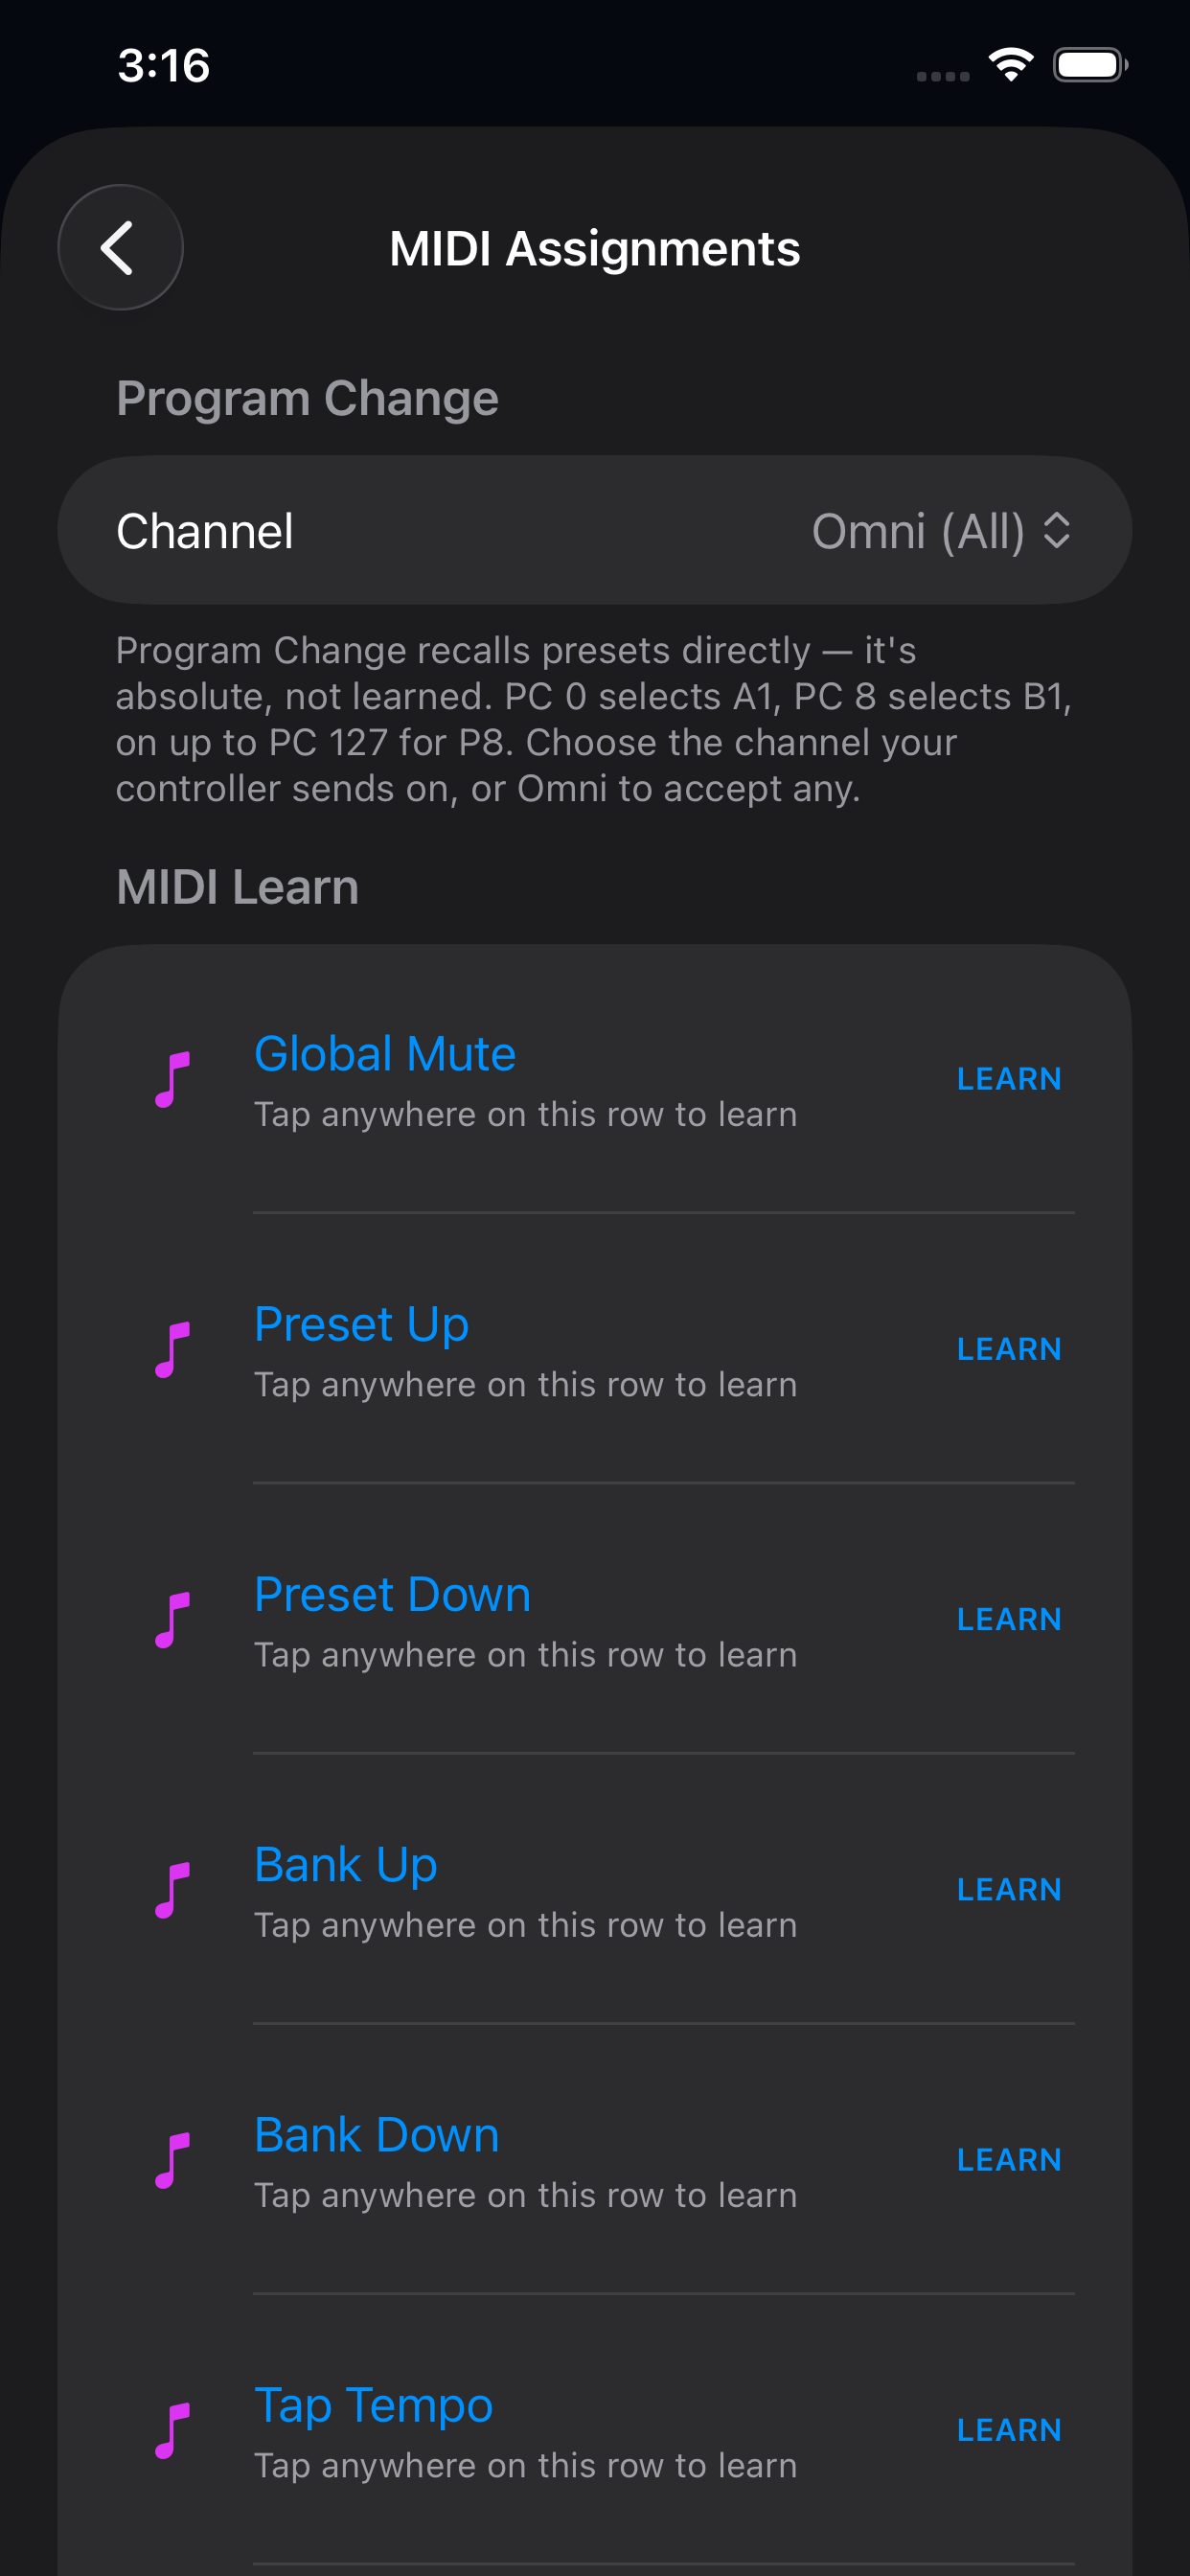
ToneRig MIDI Assignments showing Program Change and MIDI Learn actions
Program Change is absolute; MIDI Learn handles performance actions and controls.
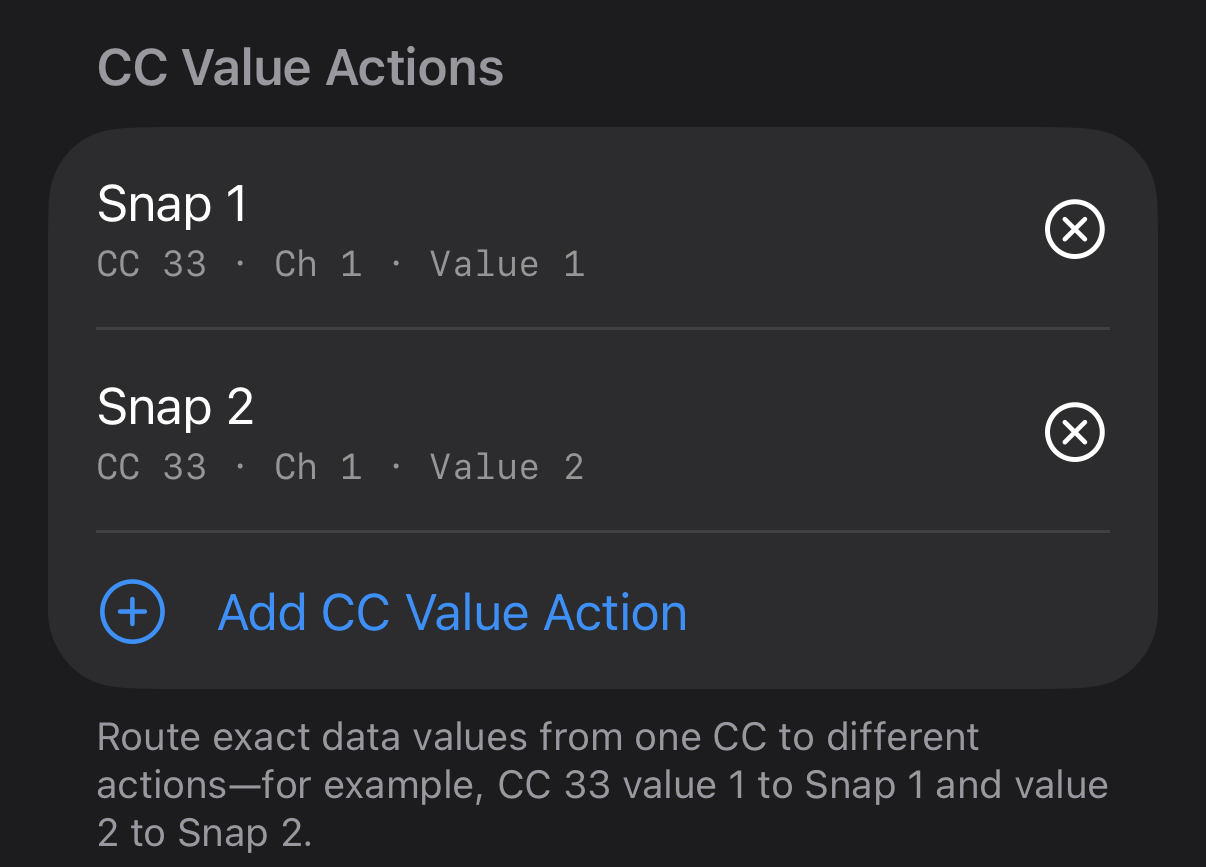
ToneRig CC Value Actions mapping CC 33 values 1 and 2 to two Snaps
One CC can address many actions by assigning each incoming value separately.
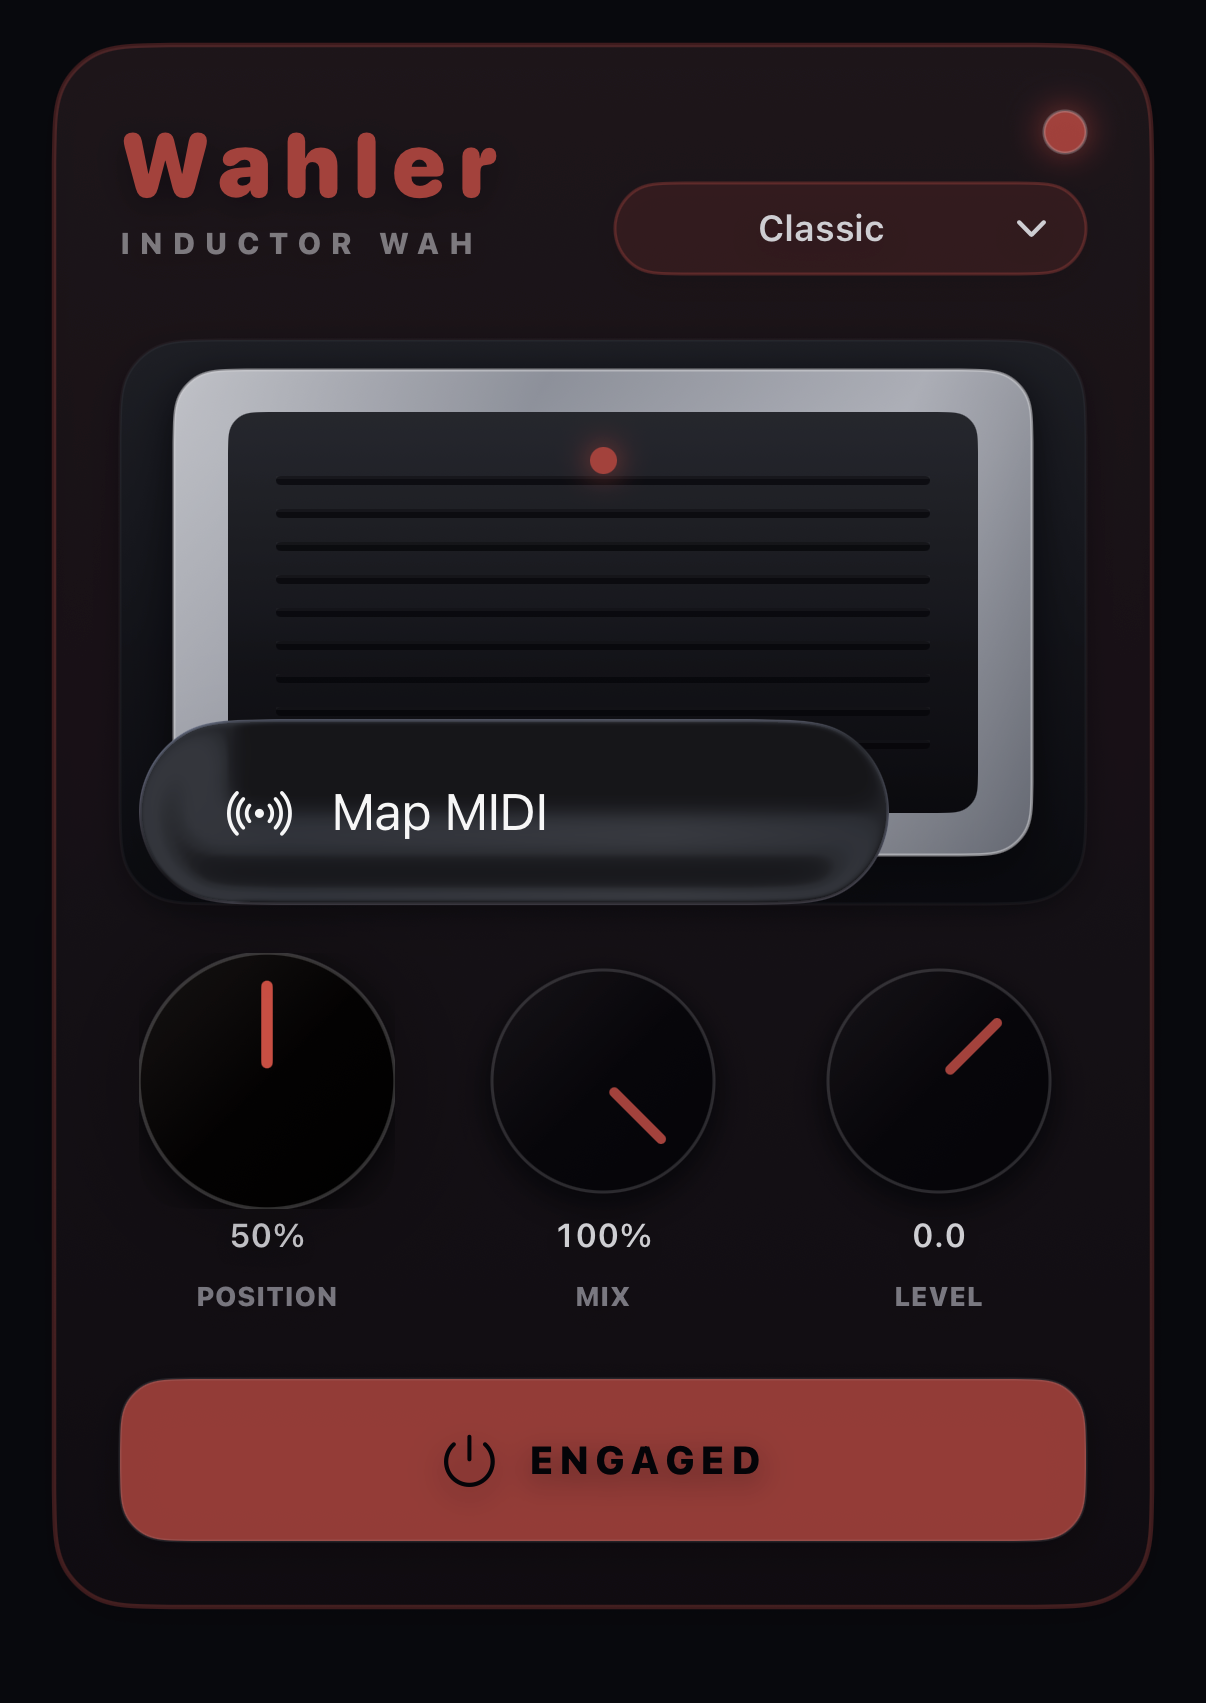
ToneRig Wah controls showing Map MIDI after holding the Position knob
Touch and hold Position to reveal Map MIDI, then move the expression pedal to assign it.

Connect a controller

ToneRig listens to available Core MIDI sources. For a wireless controller, open Settings and Bluetooth MIDI to pair it. The assignment screen shows global mappings plus mappings belonging to the current preset.

Program Change is absolute

Program Change recalls preset slots directly and does not use MIDI Learn. PC 0 selects A1, PC 8 selects B1, continuing through PC 127 for P8. Choose a specific channel or Omni to accept Program Change on all channels.

MIDI Learn

Open Settings → MIDI Assignments and tap Learn for a global action, then send a note or CC. You can learn Global Mute, Preset Up/Down, Bank Up/Down, Tap Tempo, Edit/Snaps/Live mode, Tuner On/Off, Metronome Start/Stop, looper commands, and metronome volume. Exact On, Off, Start, and Stop actions make LED footswitch states and one-way commands predictable.

Learn controls where they live

Touch and hold a preset for direct preset recall, a Snap for direct Snap recall, an effect for bypass, a supported knob for continuous control, or the metronome Start/Stop button for transport. Sending the desired note or CC completes the assignment.

Direct Snap and preset selection

MIDI actions include Snap Up/Down, Snaps 1–8, and Presets 1–8. Direct Preset actions address the eight slots in the current bank; Program Change remains the way to address all 128 slots absolutely.

Exact CC-value actions

One CC number can route different data values to different actions. For example, CC 33 value 1 can select Snap 1 while value 2 selects Snap 2. Conflicting values are flagged before an existing assignment is replaced.

Control ToneRig from other apps

The standalone app publishes a stable ToneRig MIDI Input destination for Note, CC, and Program Change messages sent by apps such as Loopy Pro. In an AUv3 host, every general MIDI action is also exposed as a momentary Audio Unit parameter, so the host can automate preset, bank, Snap, bypass, tap-tempo, tuner, metronome, and looper commands even while the ToneRig editor is closed. MIDI handling remains a Pro feature.

Map a wah pedal

Open the Wah controls, then touch and hold the Position knob until Map MIDI appears. Tap Map MIDI and move the expression pedal through its travel to create the assignment. If heel and toe move the wah in the wrong direction, open Settings → MIDI Assignments, select the Wah Position expression-pedal assignment, and turn on Reverse.

Expression pedals

Learn a CC to a compatible continuous parameter, then calibrate the physical heel and toe positions. Calibration is saved per learned pedal, filters endpoint jitter while capturing, and can reverse direction when the hardware travels opposite the desired control.

Edit or clear mappings

Tap an assignment to edit its message type, channel, or number. Clear one mapping from its row, clear a block or control from its touch-and-hold menu, or use Clear All Assignments to remove global, value, preset, bypass, and knob mappings together.

07

Tuner, tempo, and metronome

The practice tools are always close, and their important actions can be learned to MIDI.

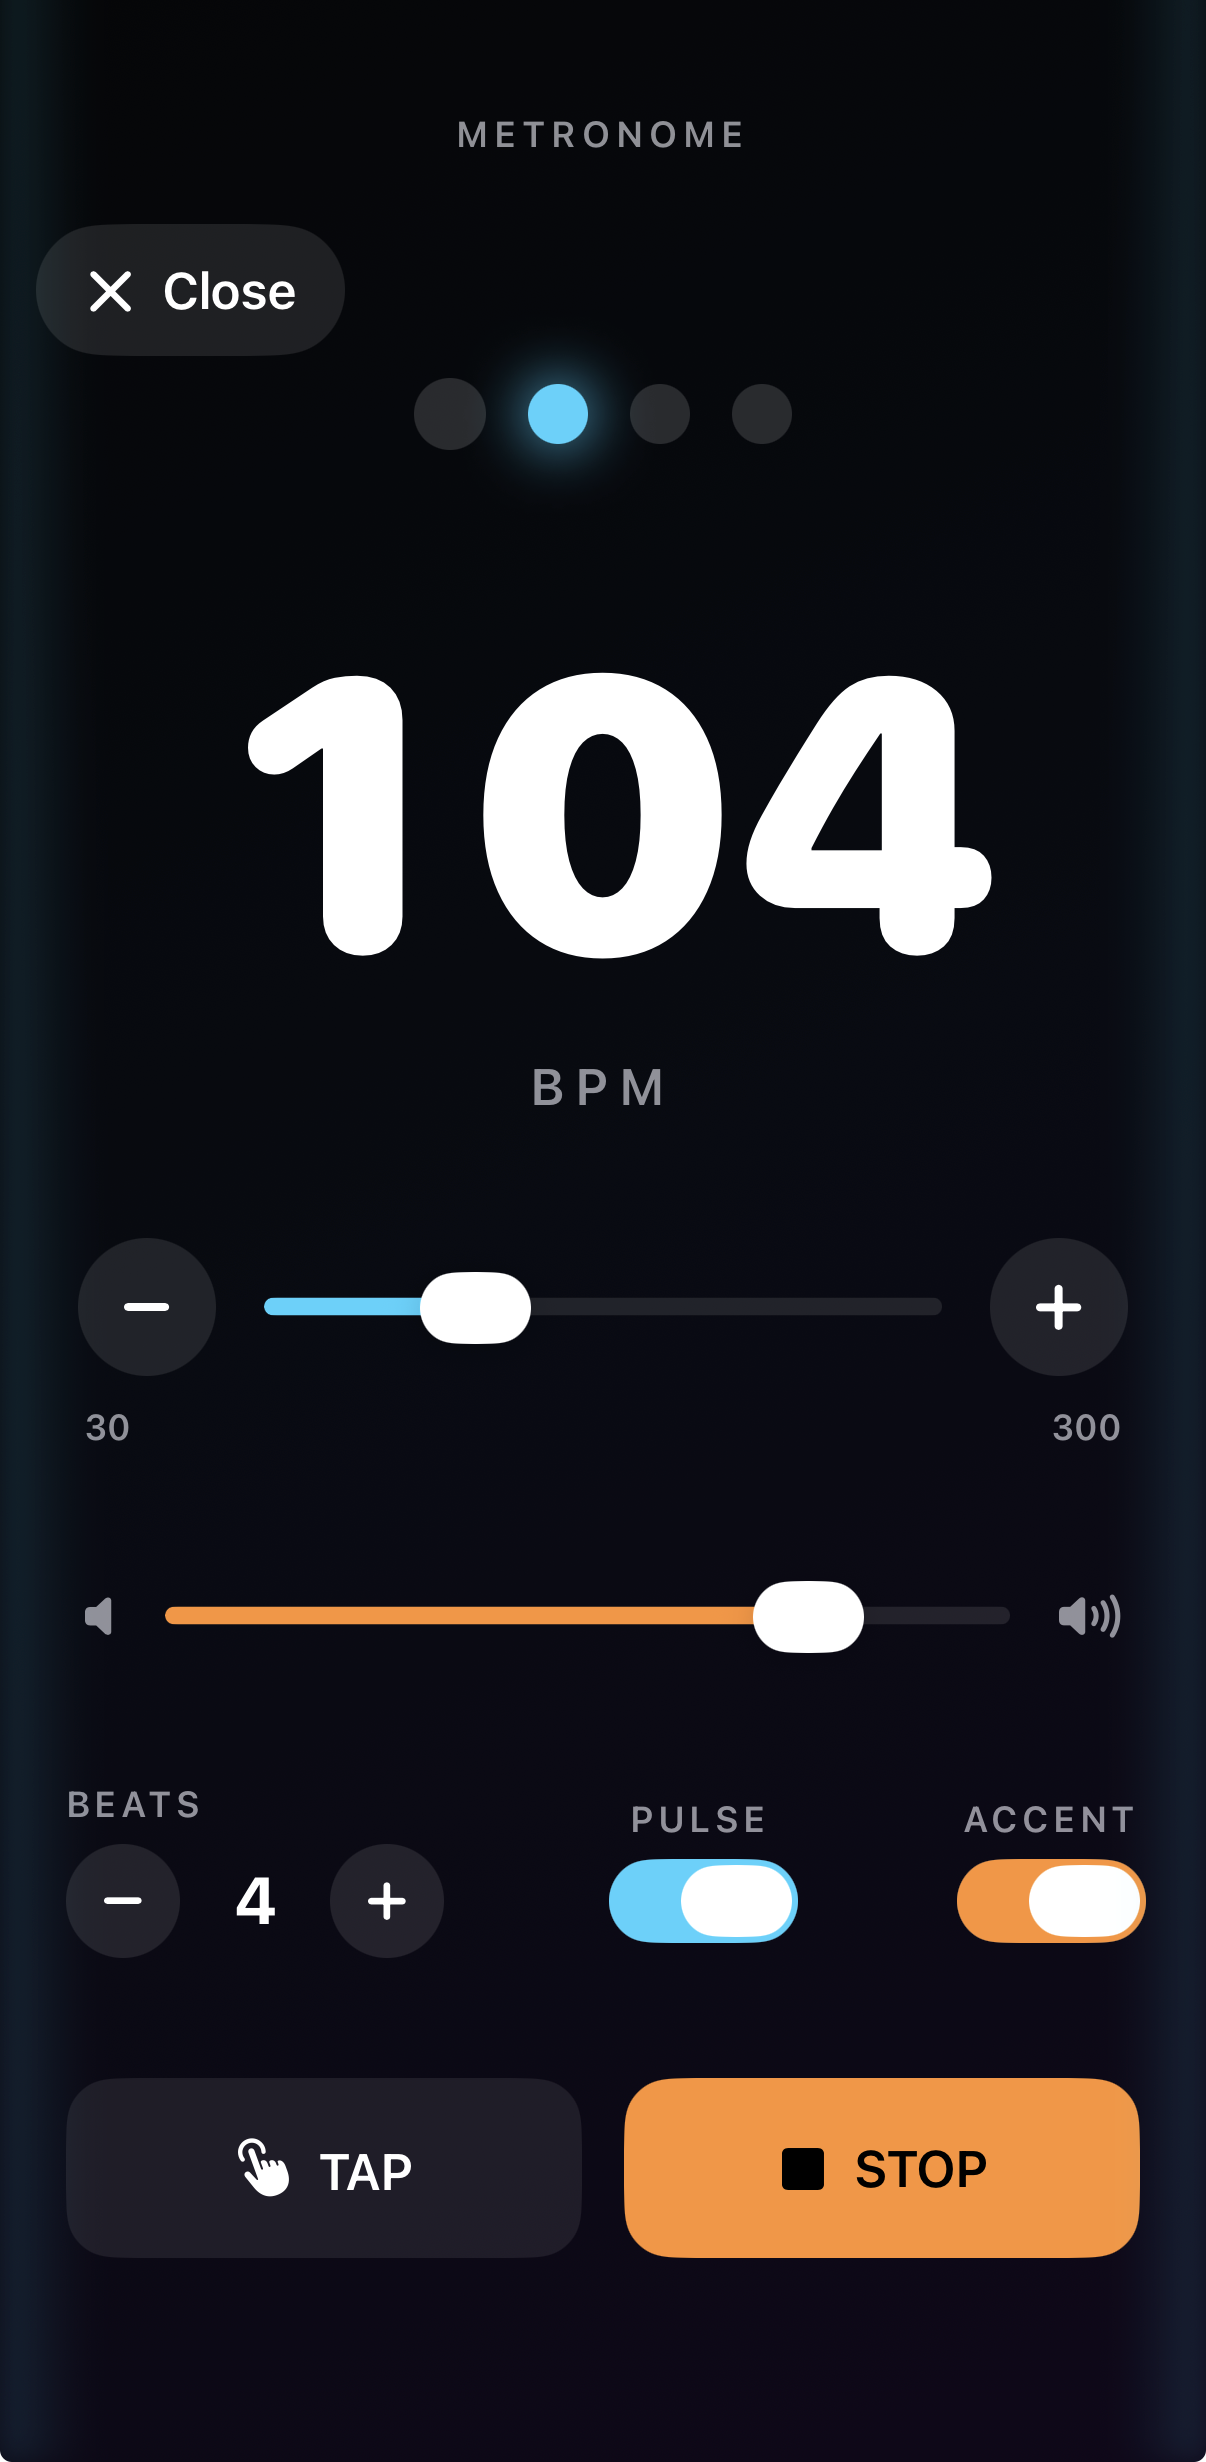
ToneRig metronome showing BPM, volume, beats, pulse, accent, tap, and stop controls
Tempo, volume, meter, visual pulse, accent, tap, and transport all remain on one screen.

Chromatic tuner

Open Tuner from the workspace. It listens to a boosted private analysis feed and displays note, octave, cents, and frequency once the signal is strong enough; monitored and processed audio keep their normal level. The AUv3 tuner uses the same confidence filtering and responsive display, and can mute the output while tuning. If it stays on Waiting for signal, use it as a quick check of the selected input and cable path.

Tap tempo

Tap the tempo control repeatedly to set BPM. With Global Tap Tempo off, tempo is saved and recalled per preset. Turn it on in Settings to keep one tempo across presets and sessions.

Metronome

Choose tempo, one to twelve beats per measure, accent behavior, and volume, then start or stop playback. Touch and hold Start/Stop to assign it to MIDI.

Visual pulse

Metronome Pulse can flash both sides of the app in time. Accented downbeats use orange and regular beats use cyan. The preference persists between launches and can be disabled when you want a quieter stage screen.

08

AUv3, Mac, and backup

Use ToneRig inside a host or as a native Mac app, move your library through iCloud, and know which features belong to each build.

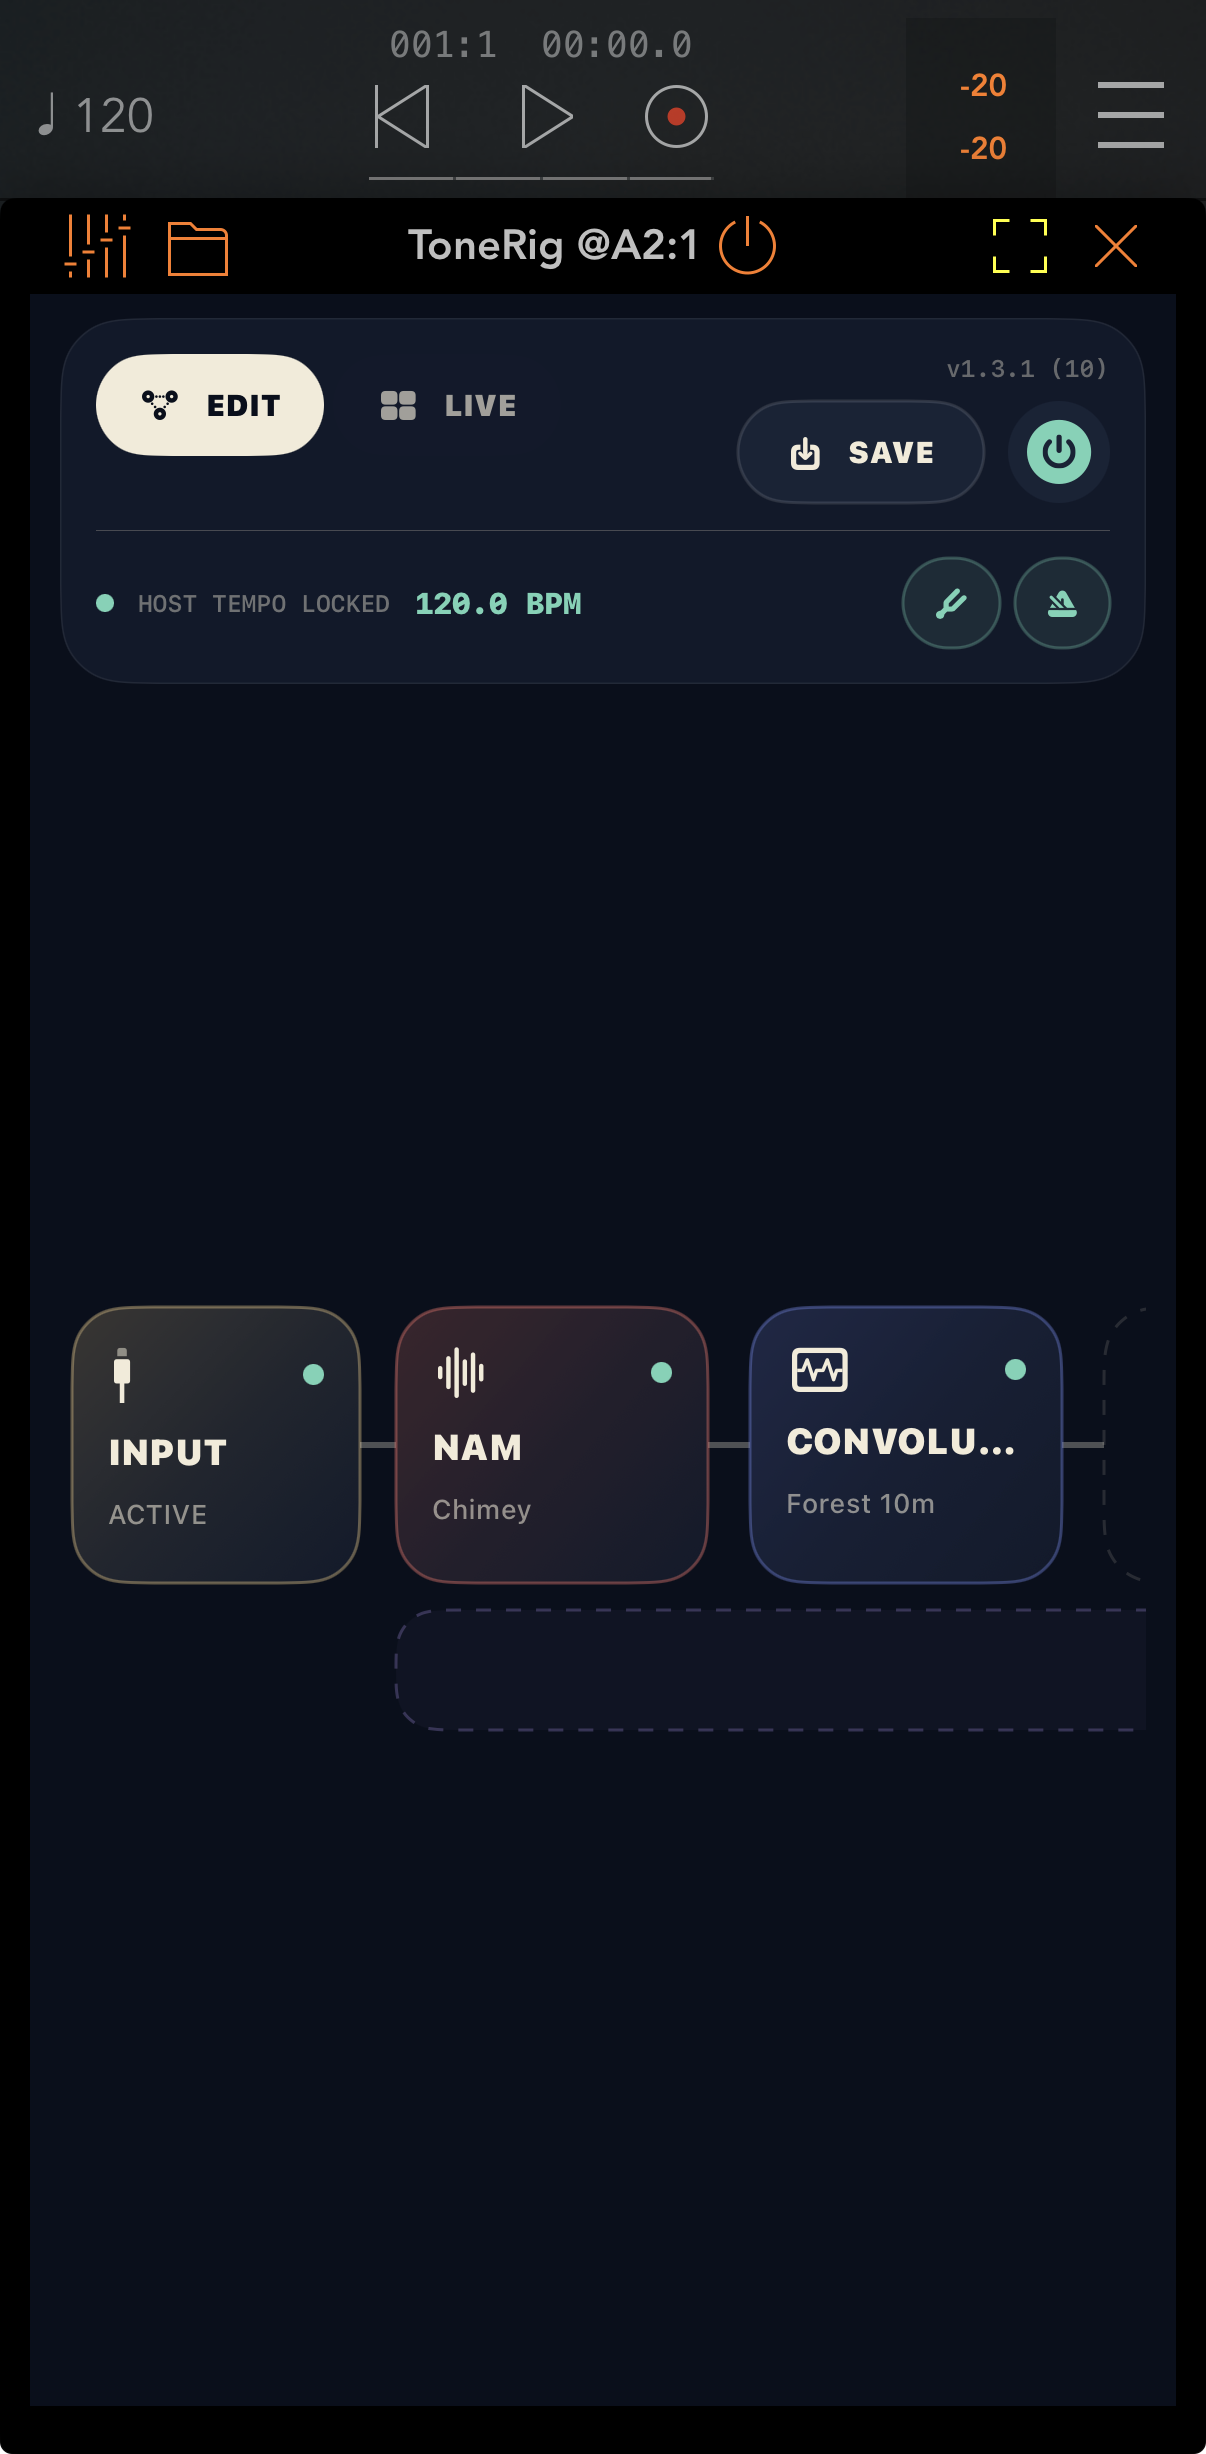
ToneRig AUv3 running inside an audio host with host tempo locked
ToneRig inside an AUv3 host, following host tempo while keeping its editable signal chain.

Use ToneRig as an AUv3 effect

Launch the standalone app once to initialize shared storage, save at least one preset, then add ToneRig as an audio effect in a compatible host such as GarageBand, Logic, or AUM. Refresh or reopen the plug-in if newly saved presets do not appear immediately.

Host controls and state

The extension exposes preset selection and automatable input, output, mix, and bypass parameters, plus momentary parameters for every general MIDI action. It follows host tempo where available, restores its full state, and includes the same responsive tuner and metronome tools as the standalone app. Use the ToneRig MIDI Music Effect identity in hosts that need a MIDI destination on the loaded audio processor; the original ToneRig Effect identity remains available in standard audio-effect browsers.

Use the native Mac app

ToneRig on Mac uses the same preset library and pedalboard workflow. The Mac App Store build stays sandboxed and lists only the Audio Units macOS allows it to load. ToneRig Suite is signed and notarized for direct distribution and can host traditional Mac Audio Units as well; their real interfaces open out of process in separate resizable windows. The list is filtered for the running build, so every plug-in shown is one that build can open.

Current AUv3 limits

The extension renders serial NAM, Cab IR, delay, and multiple independent reverb blocks. Parallel routing and nested third-party AUv3 effects remain standalone-only.

Back up to iCloud

ToneRig Pro can manually back up presets, NAM models, and IRs to your private iCloud, then restore them on another device using the same Apple Account. Restore replaces the local library, so use a fresh backup before moving between devices.

09

Troubleshooting

Most setup problems can be narrowed down with the meters, route readout, and overload counter.

No input signal

Confirm the interface is selected, the instrument is connected to the chosen input, and Global Mute is off. Open the tuner and watch the input meter. If neither responds, change the input channel or test the interface in another audio app.

Dry sound under the rig

Disable direct or hardware monitoring on the audio interface. Direct monitoring sends the unprocessed input straight to the outputs while ToneRig sends the processed signal, so both are heard together.

Clicks, crackles, or overloads

Open Settings and check Audio Overloads. Increase the buffer, reduce A2 NAM quality, bypass the heaviest effects, or simplify the chain. Convolution reverb, full-quality NAM, and third-party Audio Units can use more of the real-time budget.

Loud feedback

Lower the interface output and ToneRig output before loading high-gain captures. Keep speakers away from the instrument and begin with headphones when testing an unfamiliar model.

MIDI does not respond

Verify the source is connected, the assignment channel matches, and the learned note or CC number is correct. Program Change has its own channel setting and will not appear as a learned mapping. For exact-value actions, also confirm the incoming CC data value.